How to Stop PowerPoint Slide show
PowerPoint is recognized as the industry standard tool for presentations and slideshows, and as part of the Microsoft Office suite of applications, the latest version comes with a wealth of useful features and tools. When running a business slideshow, the user has full control over most aspects of the presentation, including how long individual frames are shown for, whether or not they advance automatically, and whether or not the presentation as a whole is set to loop again from the beginning. You can disable automatic looping for individual slides or for the entire presentation.
Individual Slides
Step 1
Select the slide you wish to edit from the thumbnail list on the left-hand side of the PowerPoint interface.
Step 2
Click "Transitions" on the ribbon menu at the top of the interface to open the tab containing the "Advance Slide" options, on the right-hand side.
Step 3
Untick the option labelled "After:" to prevent the slideshow from progressing after a certain time period has passed. If you also wish to disable the ability to advance the slide with a mouse click, untick the "On Mouse Click" check box. Changes are saved immediately.
Entire Presentation
Step 1
Click on the "Slide Show" tab on the ribbon menu at the top of the interface, then click the "Set Up Slide Show" icon to bring up the associated dialog.
Step 2
Untick the check box marked "Loop continuously until Esc" under the "Show options" heading to prevent the presentation from starting again with the first slide after the last one has been displayed.
Step 3
Check the box marked "Manually" to over-ride any timings associated with any of the slides in the presentation. This is a useful alternative to unticking the "After:" box on each individual slide. It does not affect the "On Mouse Click" setting for each slide.
Step 4


Click "OK" to confirm your choices and to disable the looping feature of the presentation.
How to Apply Custom Animation Effects in Presention 2013
Kingsoft Presentation offers several animation effects that can be applied to text, pictures and other content. These animation effects are easy to use and allow the user to make each and every slide unique.
The settings of each animation effect can be adjusted to fit all kinds of needs. These settings allow the user to customize the motion path, speed and duration of each animation effect.
If there are animation effects on a slide, they will appear in order and can be rearranged within the Custom Animation task window.
Tips: Animation schemes can be used to simplify and speed up the designing process of animation effects.
Types of Custom Animation
There are three general categories for custom animation effects in Kingsoft Presentation.
- 1. There are 52 different Entrance Effects which control how objects initially appear on the slides.
- 2. There are 31 different Emphasis Effects which control the actions that objects perform on the slides.
- 3. There are 52 different Exit Effects which control how objects disappear from the slides.
Add Animation to Text or Objects
To insert an animation effect, follow the steps below:
Step 1 Choose a slide containing text or other objects. Select the text or objects to which you want to add animations.
Step 2 In the Animation tab, click Custom Animation  and the Custom Animation task window will appear on the right.
Step 3 In the Custom Animation task window, click the Add Effects icon  and the following options will become available in the drop-down list:
Step 4 Choose Entrance in the drop-down list to add an animation effect to the object when entering the slide.
Step 5 Choose Emphasis in the drop-down list to make an object perform a special effect when presenting the slide.
Step 6 Choose Exit in the drop-down list to add an animation effect to the object when exiting the slide.
Step 7 Choose Motion Paths to designate a specific path for the object to follow on the slide.
Tips:
- 1. After applying animation effects to objects, number markers will appear on the objects. These markers indicate the order that the animations will perform when presenting the slide and the ordered list can be found in the task window. However, these markers will not be shown when the presentation is in the Slide Show mode.
- 2. Selecting Play in the Custom Animation task window will show a preview of the animations.
- 3. Click the Slide Show button to preview the slide in the Slide Show mode with all of the animation effects included.
Modify Animation of Text or Objects
In the Animation tab, click the Custom Animation icon . The Custom Animation task window will appear on the right. Another method is to select the object to be modified, right-click it, and choose Custom Animation in the context menu. Modifications can be made in the Custom Animation task window.
- 1. Modify when to start the animation effects by choosing among the three Start options: On Click, With Previous, and After Previous. On Click will start the animation effect when the presenter clicks the mouse.With Previous will start the animation effect at the same time as the animation effect preceding it. After Previous will start the animation effect after the animation effect preceding it has finished.
- 2. Modify the direction objects enter or exit the slide form with the Direction option. Some animation effects do not have this option due to the nature of the animation effect.
- 3. Modify the time necessary for an animation effect to perform with the Speed option. The available options areVery Slow, Slow, Medium, Fast, and Very Fast. See below:

Figure 1 Modify animation
The following steps describe another method of modifying the Speed:
Step 1 In the Animation tab, click Custom Animation .
.
Step 2 Select the animation effect to be modified in the Custom Animation task window and click the drop-down arrow at the end.
Step 3 Select Show Advanced Timeline in the drop-down list and the result should resemble Figure 2.


Figure 2 Show Advanced Timeline
Step 4 Upon moving the mouse over a time block, the cursor will change to a re-sizing arrow that allows you to click and drag the time blocks.
Step 5 Drag the time blocks to modify the duration of the animation effects.
Change Animation of Text or Objects
To change the animation effects of one or more objects, select them in the Custom Animation task window and click Change, as shown below:

Figure 3 Change animation
Choose the animation effect you want to change with in the drop-down list.
Rearrange the Order of Animation Effects
To rearrange the order of animation effects, take the following steps:
Step 1 Select the slide with the animation effects which need to rearrange.
Step 2 Click Custom Animation in the Animation tab.
Step 3 Select the animation effect that needs to be rearranged in the Custom Animation task window and drag it to form the desired order.
Remove Animation Effects
To remove animation effects, take the following steps:
Step 1 Select the animation effect that you want to delete in the Custom Animation task window.
Step 2 Click Remove or right-click and select Remove in the drop-down list as shown in Figure 4.

Figure 4 Remove Custom Animation
Where is the Delete Slide in Microsoft PowerPoint 2007, 2010 and 2013
In PowerPoint 2007, 2010 and 2013, there are two steps to get the Delete Slide. You need change your PowerPoint 2007, 2010 and 2013 interface into Normal view, and get the Slide / Outline task pane firstly; then select slides and delete it in right-click menus.
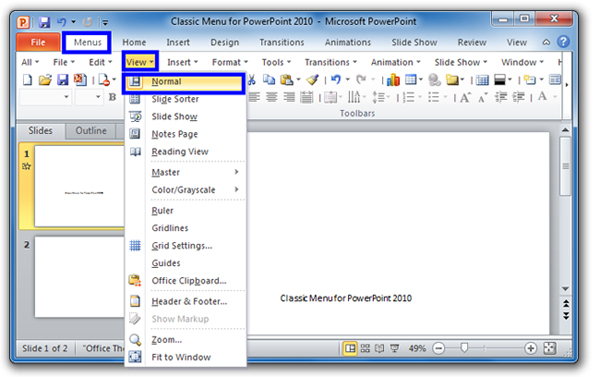
Method A: Show PowerPoint 2007/2010/2013 in Normal View with Classic Menu for Office
- Click the View drop down menu in main menus;
- Click the Normal item, then your PowerPoint 2007/2010/2013 interface will be in Normal View
Figure 1
Method B: Get into Normal View from Ribbon if you do not have Classic Menu for Office
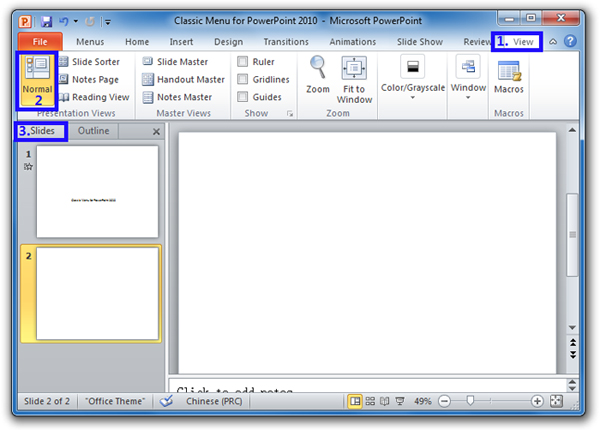
- Click the View tab;
- Go to the Presentation Views group;
- Click the Normal button.

Figure 2
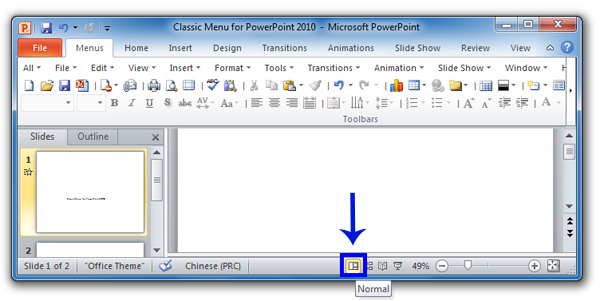
Method C: Get into Normal View from Status bar
At the bottom of Microsoft PowerPoint 2010/2007, click the Normal view button and get into Normal view.

Figure 3
Step 2: In Normal view:
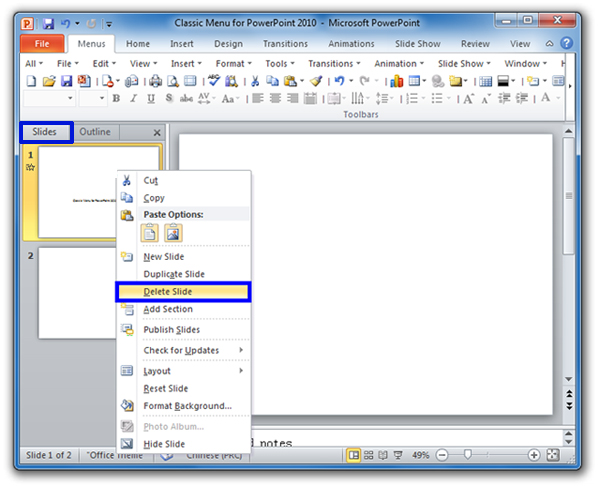
- You will view the Slide/ Outline task pane at left side;
- Click the Slide tab;
- Select the slide you need to delete, right click this slide, and you will view the Delete Slide item in right-click menu.

Figure 4
Presenting Your Slide Show in Powerpoint
Presenting a slide show
Before you present your slide show, you'll need to think about the type of equipment that will be available for your presentation. Many presenters use projectors during presentations, so you might want to consider using one as well. This allows you to control and preview slides on one monitor while presenting them to an audience on another screen.
To start a slide show:
- Click the Start From Beginning command on the Quick Access toolbar, or press the F5 key at the top of your keyboard. The presentation will appear in full-screen mode.

You can also click the Play Slide Show command at the bottom of the PowerPoint window to begin a presentation from the current slide.

Click the Slide Show tab on the Ribbon to access even more options. From here, you can start the presentation from the current slide and access advanced presentation options.

To advance and reverse slides:
- You can advance to the next slide by clicking your mouse or pressing the spacebar on your keyboard. Alternatively, you can use or arrow keys on your keyboard to move forward or backward through the presentation.
You can also hover your mouse over the bottom-left and click the arrows to move forward or backward.

To stop a slide show:
- You can exit presentation mode by clicking the Esc key on your keyboard. Alternatively, you can click theSlide Show Options button in the bottom-left and select End Show.

The presentation will also end after the last slide. You can click the mouse or press the spacebar to return to Normal view.


No comments:
Post a Comment