Animating a Chart
By animating the elements of the graph, you can make your points more clearly. Each piece of a chart can be displayed on the screen one at a time.
Step 1 - Create a chart using PowerPoint
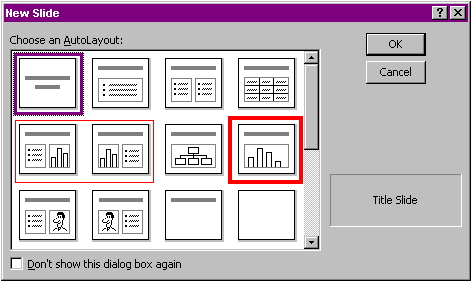
Select a slide layout which includes the chart. The window below indicates three layouts with charts, I selected the one without text.

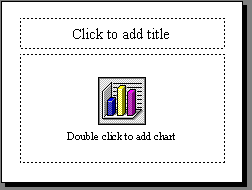
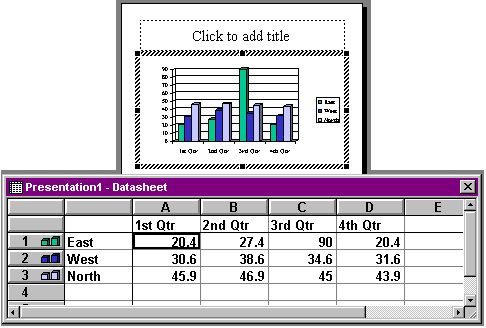
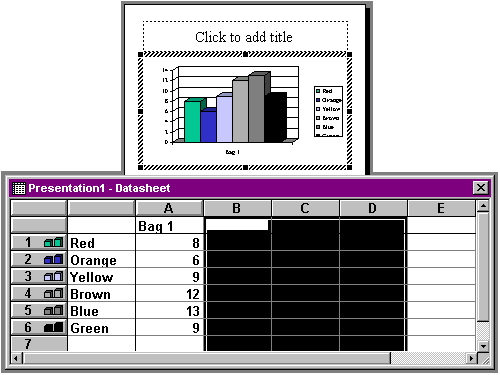
To begin entering data to create a table, double click on the chart icon.

I strongly advise that you change only a few cells at a time. Do not delete all of the data. As you enter data the chart associated with the spreadsheet will change. That way you know what changes you need to make. If you had deleted everything before starting you may not be sure where the color names and numbers should be placed to create the chart.

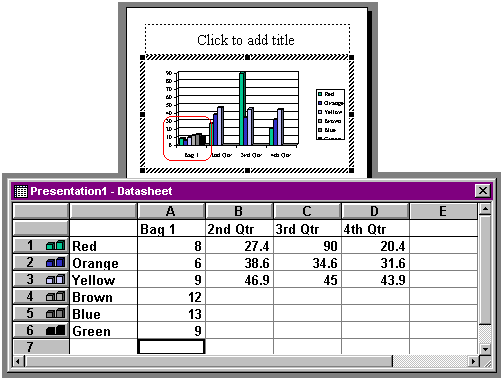
Enter the data collected from the M & M activity. I listed the six colors and how many of each color I found in the bag.

After all data has been entered into the spreadsheet, delete the remaining data. To do this quickly I highlighted columns B, C, and D and deleted the columns.

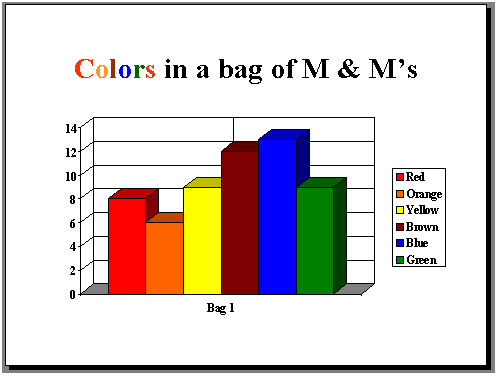
Closing the spreadsheet produces a chart on the slide you were working on. I made further modifications by changing the colors to match the M & M colors from my graph.

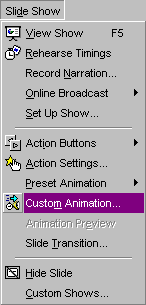
Step 2 - To animate the chart, go to the Slide Show menu and choose Custom Animation

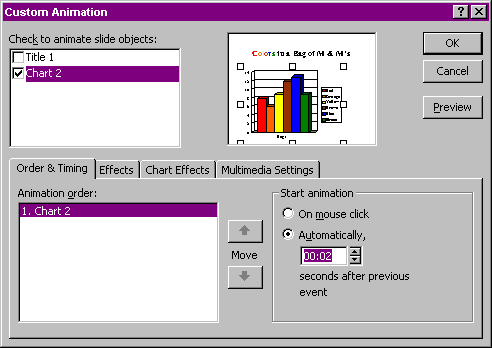
Step 3 - Working with the Custom Animation pop-up box
- Select the Chart Effects tab
- Check the box beside Chart
- Select how you want the chart elements to be presented ( by Series was my choice)
- Choose an Entry animation
- Use restraint, don't select a sound to go with the animation. Write me , I will explain.
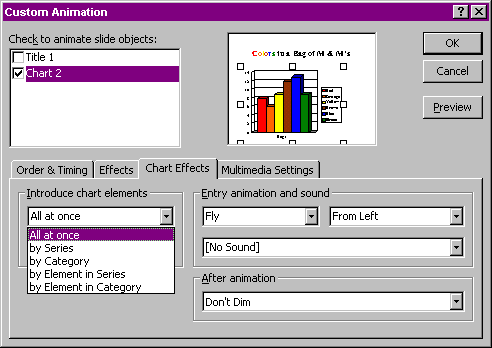
When you think you have what you want, select the preview button to see what your chart animation looks like. Make any changes you want to before selecting OK.
Step 4 - One final touch.
Unless you went to the Order & Timing tab and selected automatic, you must click your mouse for each part of the chart to be displayed.

On the Order & Timing tab select automatically and use the up or down arrows to set the number of seconds between displays.
Note: If you are a real techie, and love playing around with what PowerPoint will do, go to a page to see how to make the same thing happen by using ungrouping .
How to make PowerPoint Bar Charts Grow or Shrink
1: Masking (Easy)
The first technique is a quick workaround using additional Autoshape boxes.
To make a bar shrink, you create a rectangle the same colour as your slide background, and animate it in over the top portion of your slide.
To make the bar grow, you create a rectangle the same colour as your existing bar, and animate it in to extend your bar’s height.
You need to match your box to the background or the existing bar. If (for whatever reason) you can’t format your shape to perfectly match – for example, if you have a picture on your slide background – this method won’t work for you. But it’s great if your slide has a blank background, or your bar is a single block colour.
2: Replacing (Moderate)
A slightly more complex – but more effective – method to make your PowerPoint bar chart grow or shrink is to replace your existing bar with a completely new one. You simply replicate your bar, adjust it to the size you need, and animate it in as you animate out the existing bar. This will work the same way if you want your shape to grow or to shrink.
The neatest way to animate this effect is to use the ‘Wipe’ animations – and choose ‘Up’ as the direction. Timing them together will give you a simple, clean effect. Below the bars are shown in different shades just for illustration. Make them the same colour and line them up in your slide.
3: Grouping and Growing (Challenging)
If you’re a perfectionist (or work for BrightCarbon) the first two just won’t give you the effect you’re after – both are a little clunky and not quite as smooth as they could be. To make something grow or shrink really smoothly, you need to use the ‘Grow/Shrink’ emphasis animation.
The problem is that when you use this effect, and you change the ‘Effect Options’ to apply vertically, PowerPoint makes the shape grow from the centre, rather than either end. On a chart, this means that the bar will extend upwards but also downwards through the x axis. Very irritating.
To overcome this, you need to give PowerPoint a new shape centre from which to grow (in other words, you need to double the size of the shape). The easiest way to do this is to replicate your existing bar and group the two shapes while they are end-to-end. Now make the second shape transparent (no fill and no line). Sit your group so that the join between the two shapes sits on the x axis.
Now, apply a ‘Grow/Shrink’ animation to this group. Remember to change the animation options to ‘vertical’ so it only moves up or down, not outwards. PowerPoint will extend or contract the entire group – and because only half your group is showing, it will give the effect of growing or shrinking from just one end. Perfect!
4: Growing and Moving (Challenging)
If you have little patience with grouping, or transparency is just not for you, an alternative is available. This time around, there’s no need to create a duplicate. You apply a ‘Grow/Shrink’ animation to your existing bar (remembering to change the options to ‘vertical’). It will grow or shrink from both ends (damn). However, to compensate, apply a ‘Motion Path’ to play at the same time.
If you want your bar to shrink, you’ll want your motion path to movedownwards. If you want it to grow, you need your motion path to moveupwards. In either case, the aim is that it should keep the bottom of your shape glued to the x axis as it changes size. The size you’ve asked your bar to grow or shrink will affect how far you need your shape to move. Trial and error is the only way you can get this right, so zoom right in to your slide, hold down ‘Shift’ (to lock the direction of your motion path) and position the red ended arrow where it needs to be. One further thing: to make the animation run smoothly, you need to open up ‘Effect Options’ of your motion path and move the ‘Smooth start’ and ‘Smooth end’ sliders both down to zero – that should see you right.
In an ideal world, there would be a convenient ‘Grow/Shrink Bar in a Single Direction’ animation. Until then, try each of these methods for growing or shrinking your PowerPoint bar charts – then pick your favourite.
Playing MP3 Files on Powerpoint with a Slide Show
Introduction
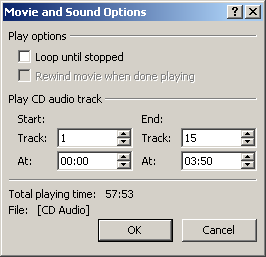 Microsoft PowerPoint has always been able to play audio tracks from a CD as part of a slide show. To do this, put an audio CD in the CD drive and select from the pull-down menu. You can then control which track is played by making the relavant settings in the Movie and Sound Options dialogue box, shown on the right.
The problem with this approach is that you need the original CD and a computer with a CD drive in order to play the show. This is particularly problematic if you want to run the show from a CD. A much better option is to convert the audio CD tracks to MP3 files and then play the files as part of the show rather than the original audio CD. This will make your shows much more portable and less likely to suffer from glitches.
There are a number of ways you can convert CD tracks to MP3 files, but if you are unsure about this, look at the Converting Audio CD tracks to MP3 Files tutorial for step-by-step instructions.
 Microsoft PowerPoint has always been able to play audio tracks from a CD as part of a slide show. To do this, put an audio CD in the CD drive and select from the pull-down menu. You can then control which track is played by making the relavant settings in the Movie and Sound Options dialogue box, shown on the right.
Inserting the MP3 File
This tutorial assumes that you already have some MP3 files ready to use. Place these files in the same folder as the presentation file you are currently working on. See Playing the Audio Track, below for more details.
In your PowerPoint presentation, find the slide to which you would like to add an audio track. Then select from the pull-down menu. Find the MP3 file you want using the Insert Sound dialogue box and click the OK button. You are then asked if you want the sound to play automatically within the slide show. Click Yes or No as appropriate. You can always change this later if you are not sure.
You will see a small icon appear in the center of the slide. This icon represents the sound file. Deleting the icon removes the track from the presentation. You can move the icon to another part of the slide if you need to see it during the slide show or you can move it off the slide if you want to hide it during the show. Just click and drag to move it.

There is another way to hide sound icons which we will come to later but moving the icon off slide is probably the simplest method.
Controlling Playback
PowerPoint 2002 has a number of advanced features that you can use to control when and how the track is played.
To control when the track is played, you must specify the trigger event that causes this to take place. Once you have done this, you can control how the track is played by changing parameters such as the start time and the end time.
You can control when and how animation events occur using the Custom Animation panel. To display this panel, select from the pull-down menu or right-click on the sound icon and select Either way, the panel on the right of the screen changes to show a list of all animated objects on the slide. Since a sound file is, by its very nature, an animated object, it shows up in the list and is identified by the file name.
When (trigger)
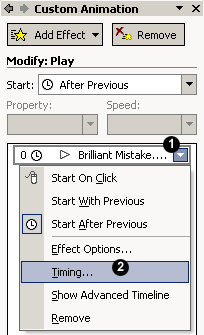 Effectively, there are three possible triggers for any animation effect, including the playing of audio tracks. These are, On Click, With Previous and After Previous. If the start trigger is set to "On Click", the track will begin to play when the mouse button is pressed. If the start trigger is set to "With Previous", the track will begin to play at the same time as the previous animation event. Using this trigger, it is possible to have the track play while some other object or objects are moving on the slide. If the start trigger is set to "After Previous", the track will begin to play after the previous animation event has finished. However, this trigger has an additional parameter that allows you to set a delay time in half second increments. This means that, for example, you could have the track play 4.5 seconds after the previous event has finished.
When you insert a sound file, the trigger is set to On Click if you choose not to start the track automatically and it is set to After Previous with a delay of 0 seconds if you choose to start it automatically. The current start trigger is displayed at the top of the Custom Animation panel in the "Start" drop-down list. It can be changed by clicking the down arrow and selecting a different option from the list.
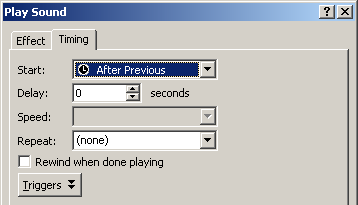 If the start trigger is set to After Previous, you can set the delay time by clicking the down arrow next to the filename in the animation list and selecting from the menu (see illustration above). This displays the Timing tab of the Play Sound dialogue box, shown on the left.
Use the Delay option to set the number of seconds that the audio track will wait, after the previous event has ended, before playing commences.
The other useful option to look at here is Repeat. You can use this to control the number of times a sound is repeated. This may not be particularly useful for lengthy audio tracks but it can be useful when working with short sound effects.
 Effectively, there are three possible triggers for any animation effect, including the playing of audio tracks. These are, On Click, With Previous and After Previous. If the start trigger is set to "On Click", the track will begin to play when the mouse button is pressed. If the start trigger is set to "With Previous", the track will begin to play at the same time as the previous animation event. Using this trigger, it is possible to have the track play while some other object or objects are moving on the slide. If the start trigger is set to "After Previous", the track will begin to play after the previous animation event has finished. However, this trigger has an additional parameter that allows you to set a delay time in half second increments. This means that, for example, you could have the track play 4.5 seconds after the previous event has finished.
 If the start trigger is set to After Previous, you can set the delay time by clicking the down arrow next to the filename in the animation list and selecting from the menu (see illustration above). This displays the Timing tab of the Play Sound dialogue box, shown on the left.
How (effect)
To control how the track is played, click on the down arrow located to the right of the sound file name on the Custom Animation panel and select from the menu. This will display the Effect tab of the Play Sound dialogue box, shown below.
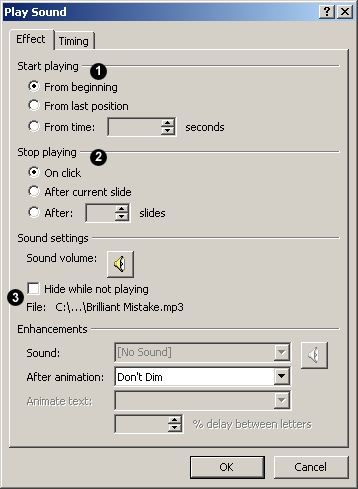 The Effect tab is used to control the start and stop timings for the track and this can be activated in a number of different ways.
You can choose to start a track "From beginning", "From last position" (assuming that it has already started and then stopped) or "From time". The From time option can be used to start playing from a particular time location within a track to the nearest second. The time shown "00:00" is in minutes and seconds.
You can also choose how to stop playing the track. The audio track will not automatically play until it reaches its end, it will be ended by some event. The Stop playing option allows you to control this event. A track can be stopped On click, After the current slide or After a specified number of slides. The track will continue to play until it reaches the specified event, however, the track will stop automatically if it comes to its end before the stop event is reached.
The sound settings section of the dialogue box can be used to control the volume of the track and the visibility of the sound icon while the show is playing. You can use this Hide while not playing option as an alternative to moving the icon off slide.
 The Effect tab is used to control the start and stop timings for the track and this can be activated in a number of different ways.


1 comment:
You need an mp3 conversion software to create mp3 files.
Post a Comment