How to Hide or Display a PowerPoint
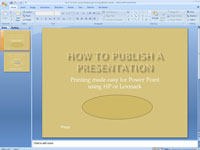
Hide a PowerPoint slide when you want to keep it on hand “just in case” during your PowerPoint presentation. You can see hidden slides in PowerPoint’s Normal and Slide Sorter views, but the audience doesn’t see them during a presentation.
Create hidden slides if you anticipate having to turn your presentation in a different direction — to answer a question from the audience, prove your point more thoroughly, or revisit a topic in more depth.
Follow these steps to hide slides:
2
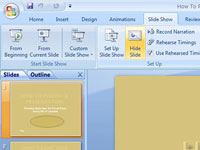
On the Slide Show tab, click the Hide Slide button.
You can also right-click and choose Hide Slide. Select the slide and click the Hide Slide button to unhide it.
3
To display a hidden slide during a presentation, right-click the screen and choose Go to.
A submenu with the titles of slides in your presentation displays. The numbers of hidden slides are enclosed in parentheses.
4
Select a hidden slide so that the audience can view it.
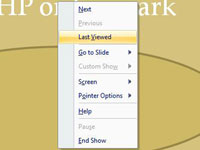
To resume your presentation after viewing only one hidden slide, right-click and choose Last Viewed on the shortcut menu. If you’ve viewed several hidden slides, rightclick the screen, choose Go to Slide, and select a slide to pick up where you left off.
AutoRecover and AutoSave Options in PowerPoint 2010
Has this ever happened to you: you have been working on a presentation for hours and suddenly PowerPoint or even the computer crashes? This may happen due to a power outage, instability of the system, or even PowerPoint itself may crash. You realize that you had not saved the presentation for a long time and you may have lost most of your work! Although you can keep your programs updated, system secure, and even save your file often, these steps provide no guarantee that you will never see a crash again and lose all or some of your work.
Fortunately, you can salvage most f your work if PowerPoint closes abnormally by enablingAutoRecover and AutoSave options. These options can be life savers as they help you prevent losing your precious work in two ways:
- Your presentation is automatically saved: This type of protection works on a file specific basis. If you enable AutoRecover or AutoSave, your file is automatically saved at a predetermined time interval. Therefore, if you have been working for a long time but forget to save a file or if your power fails, the file you have been working on contains all or at least some of the work you have done since you last saved it.
- Your program state is automatically saved: This type of protection works on the program specific basis. If PowerPoint crashes when you were working on a file that was never saved, then you will be presented with a recovered file the next time you launch the program. You can then save this file, and continue working with it -- this is an extra benefit of enabling AutoRecover orAutoSave.
Follow these steps to enable AutoRecover or AutoSave options in PowerPoint 2010:
- Launch PowerPoint, access the File menu, and choose Options, as shown highlighted in red within Figure 1.

Figure 1: Options within the File menu - This brings up the PowerPoint Options dialog box, as shown in Figure 2. Make sure the Save option is selected within the sidebar of the dialog box (highlighted in red in Figure 2).

Figure 2: PowerPoint Options dialog box - Within the PowerPoint Options dialog box, you need to select the following options within the Save presentations section:
- Make sure the Save AutoRecover information every x minutescheck-box is selected (highlighted in red within Figure 3). Also, choose how often you want to save the AutoReceover information -- to do so, enter the number in the Minutes box. Try to enter a small number in the minutes box, like 5. That way, you’ll never lose more than 5 minutes of work.
- Select the Keep the last autosaved version if I close without saving check-box (highlighted in blue within Figure 3). This option ensures that your file changes are not discarded entirely if you close PowerPoint without saving changes.
- You’ll also see the path location where your AutoRecover files are saved (highlighted in green within Figure 3).

Figure 3: AutoRecovery options within the PowerPoint Options dialog box - Make sure the Save AutoRecover information every x minutescheck-box is selected (highlighted in red within Figure 3). Also, choose how often you want to save the AutoReceover information -- to do so, enter the number in the Minutes box. Try to enter a small number in the minutes box, like 5. That way, you’ll never lose more than 5 minutes of work.
- After making the appropriate choices, click the OK button.
Create Slide Transitions in PowerPoint 2010
Transitions between slides cover much more than some movement between one slide and the next -- you can actually do a slide transition that is abrupt without any effect or you could look at any of the transition effects, all the way from simple fades and wipes to something that can cause a vertigo! In addition, transitions in PowerPoint can have set timings, and also be accompanied by transition sounds. Clearly, there is plenty to learn, and unlearn!
Whatever transition effect you may add, remember these basic concepts:
Whatever transition effect you may add, remember these basic concepts:
- Transition effects happen when the slide shows up.
- Transition speed influences how long it takes to transit from one slide to another.
- Transition timings indicate how long the slide shows on screen -- most slides that are presented during sessions or conferences do not have any fixed transition timings since speakers don’t know exactly how long they will end up speaking while a particular slide is shown. In this case, a mere mouse click takes them to the next slide.
- Transitions can have sounds, and this is one of those PowerPoint features that you should never use unless you have a compelling reason to do so!
Adding a Slide Transition
Follow these steps to add a slide transition to one or more slides:
- Navigate to the slide to which you want to add a transition. If you want to add a similar transition effect to more than one slide, access PowerPoint's Slide Sorter view and select the slides you need, as shown in Figure 1.

Figure 1: Slides selected within the Slide Sorter view - Access the Transitions tab of the Ribbon, and click the down arrow (highlighted in red in Figure 2 below) within the Transition to This Slidegroup.

Figure 2: More button within the Transition to This Slide group - This will bring up a drop-down gallery as shown in Figure 3 below. You will see that the transitions are divided into three categories: Subtle, Exciting, andDynamic Content. We suggest you to select a transition effect from theSubtle category to start with -- we chose the Fade effect (refer to Figure 3again).

Figure 3: Slide Transitions gallery - If you want to add the same transition effect to all slides in your presentation (as opposed to just the active or selected slides), then click the Apply To Allbutton located within the Transitions tab (highlighted in red in Figure 4, below).

Figure 4: Apply to All option within theTransitions tab
We explore other Transition options such as Transition Duration (speed), Transition Timings, and Transitions Sound in other tutorials of this series.
How to Create a Continuous PowerPoint Show
Microsoft Office PowerPoint 2010 enables you to visually enhance your message and present it in an appealing manner to your audience. Although you usually use PowerPoint presentations to accompany a speech, you can also play a PowerPoint show continuously while you prepare the next part of your presentation. Furthermore, if something comes up and you must pause for a few minutes, you can play the continuous show to keep your audience entertained.
Step 1
Launch PowerPoint 2010 and open the presentation.
Step 2
Click the "Slide Show" tab at the top of the PowerPoint window.
Step 3
Click "Set Up Slide Show" in the Set Up section at the top to start setting up your show. The Set Up Show window pops up.
Step 4
Place a check mark in front of the Loop Continuously Until Esc option, in the Show Options section.
Step 5
Click "OK" to save and apply the settings and close the Set Up Show window.
Step 6
Click the "Transitions" tab at the top.
Step 7
Select a slide in the left pane, press "Ctrl-A" to select all slides and then place a check mark in front of the After option in the Timing section at the top.
Step 8
Type the number of seconds you want to pass before the next slide is displayed in the box next to After.
Step 9
Press "F5" to run the presentation. Your show will play continuously until you press "Esc."


No comments:
Post a Comment