How to Use Foreground and Background Colors in Photoshop
Photoshop CS 6 has two categories of color — a foreground color and a background color. You apply the foreground color when you use the type tools, the painting tools, or the shape tools.
The foreground color is also the beginning color of a default gradient applied by the Gradient tool. Thebackground color is the color you apply with the Eraser tool and is the ending color of the default gradient.
The foreground color is also the beginning color of a default gradient applied by the Gradient tool. Thebackground color is the color you apply with the Eraser tool and is the ending color of the default gradient.
When you increase the size of your canvas, you fill the additional canvas with the background color (also assuming you don’t have layers). You can find the swatches that represent the two color categories in the lower part of the Tools panel.
Here are a few tips to help you get a handle on using tools with foreground and background colors:
- Blend the foreground and background by using the Gradient tool.When you drag with the Gradient tool across the canvas and the gradient is set to the default, you get a blending of the foreground and background colors.
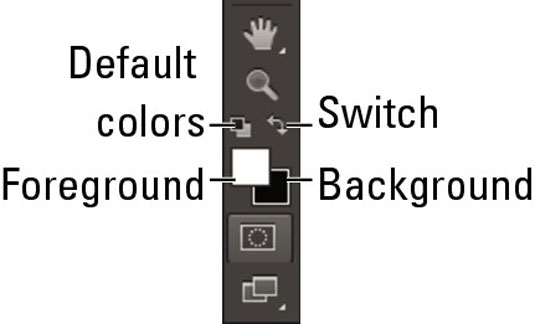
- Fill selected areas with the foreground color. Just click your canvas with the Paint Bucket tool to select areas based on a Tolerance setting and fill those areas with the foreground color.
- Apply the background color by erasing. If you’re working on a background, rather than a layer, you can use the Eraser tool to apply the background color. Some people prefer to say you’re erasing to the background or canvas color.If you use the Eraser tool on a layer, you erase to transparency.
- Add more background to your canvas and fill it with the background color. When you enlarge your canvas size, Photoshop, by default, automatically fills the added canvas with the background color.If you enlarge a layer, the extra canvas is transparent.
Cropping Images In Photoshop
Selecting The Crop Tool
As with previous versions of Photoshop, to crop an image, we start by selecting the Crop Tool, either by clicking on its icon in the Tools panel along the left of the screen or by pressing the letter C on the keyboard. I'll select it from the Tools panel:
Selecting the Crop Tool.
The Crop Handles
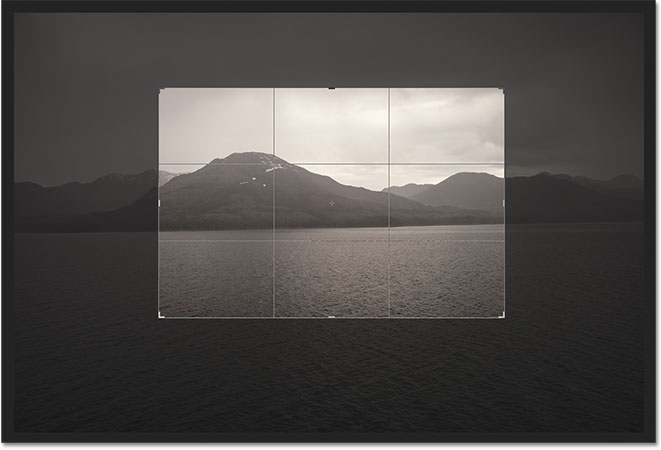
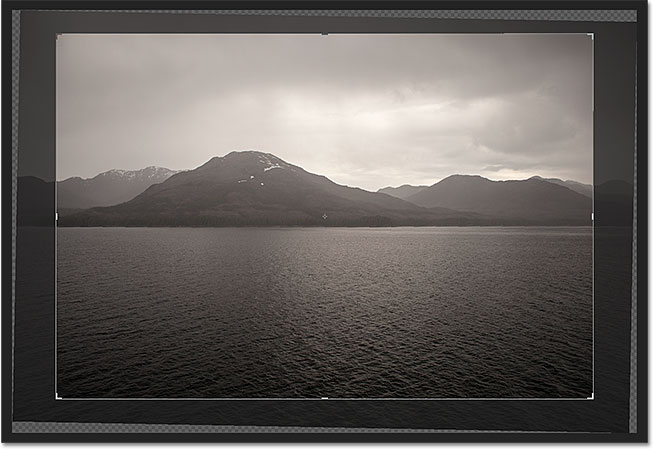
If you've used earlier versions of Photoshop, the first difference you'll notice with CS6 is that as soon as you choose the Crop Tool, Photoshop automatically places a crop box and handles around your image. You'll find a crop handle in each of the four corners as well as at the top, bottom, left and right. They look a little bit different than they did in previous versions, but they work exactly the same way:
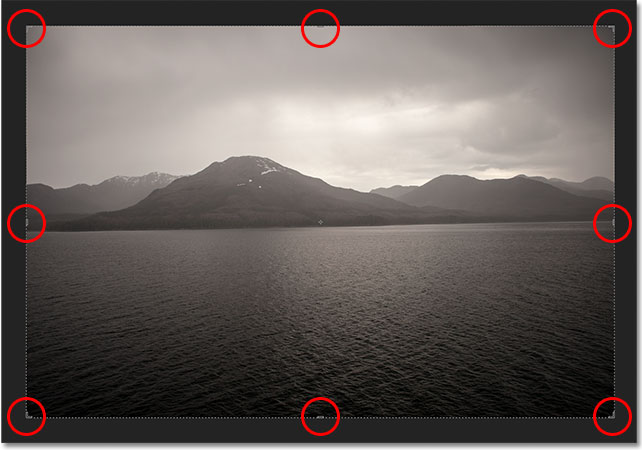
Photoshop CS6 automatically places a crop box and handles around the image.
We can click on any of the handles and, with the mouse button held down, drag them around to resize and reshape the crop box. The area inside the crop box is the part of the image you'll keep. Everything outside the box will be cropped away. Photoshop darkens the area outside the crop box so it's easier for us to see which part of the image we're keeping:
Click and drag the handles to resize the crop box.
One thing to note before we continue is that you don't necessarily have to use the initial crop handles that Photoshop CS6 places around the image. They're added purely for convenience. Just as in previous versions of Photoshop, you can also click anywhere inside the image with the Crop Tool and, with your mouse button held down, drag out your own crop box which you can then resize and reshape by dragging any of the handles. The choice is yours.
Choosing An Aspect Ratio
By default, Photoshop CS6 lets us drag the handles freely in any direction so we can reshape the crop box into any size we need. But more often than not, we want to crop a photo into a standard frame size, like 4x6 or 8x10. If you look up near the far left of the Options Bar along the top of the screen, you'll find the Aspect Ratio option which, by default, is set to Unconstrained. If you click on the word "Unconstrained", you'll open a menu with various aspect ratios we can choose from. I'll choose the 2x3 (4x6) ratio as an example:
You can choose from any of the preset aspect ratios.
Photoshop instantly snaps the crop box into the aspect ratio we chose. We can then resize the box by dragging the handles knowing that our aspect ratio is safely locked in place:
The crop border has snapped to a 4x3 aspect ratio.
If you need to crop your image to a less common aspect ratio, one not found in the list, you can easily create your own custom aspect ratio by entering the values you need into the width and height boxes directly to the right of the list:
Enter your own custom aspect ratio values if needed.
Portrait Or Landscape Orientation
To quickly rotate your crop box from landscape (horizontal) to portrait (vertical) orientation and vice versa, click theRotate icon in the Options Bar:

Click the Rotate button to switch between Portrait and Landscape mode.
I'll click the icon, and now my crop box has switched from landscape to portrait orientation. To switch back to landscape mode, I can just click the Rotate icon again. There's also a keyboard shortcut for switching between portrait and landscape mode. Press the letter X on your keyboard to jump back and forth between them:

The crop border has been rotated from landscape to portrait orientation.
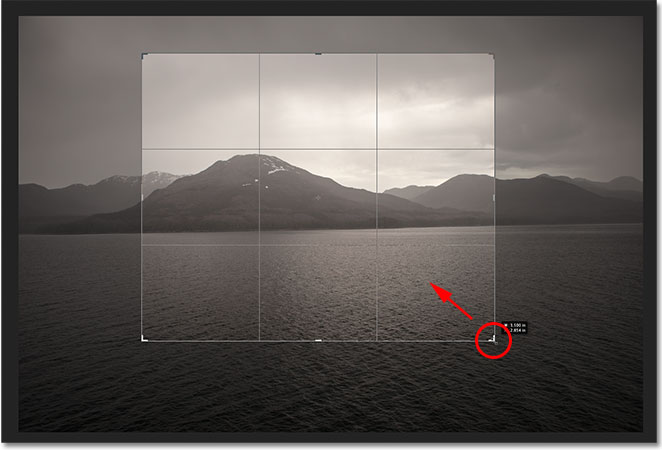
Moving The Image Inside The Crop Box
To move and reposition your image inside the crop box, click anywhere inside the box and, with your mouse button held down, drag the image into place. If you've been using an earlier version of Photoshop, you'll notice a big change here with CS6. In previous versions, dragging the mouse would move the crop box around in front of the image while the image itself stayed in place. With CS6, we get the exact opposite. The crop box now stays in place while the image moves around inside of it! It's tough to see in a static screenshot, but my crop box actually hasn't moved. It's the photo itself that's moving as I drag it around with my mouse:
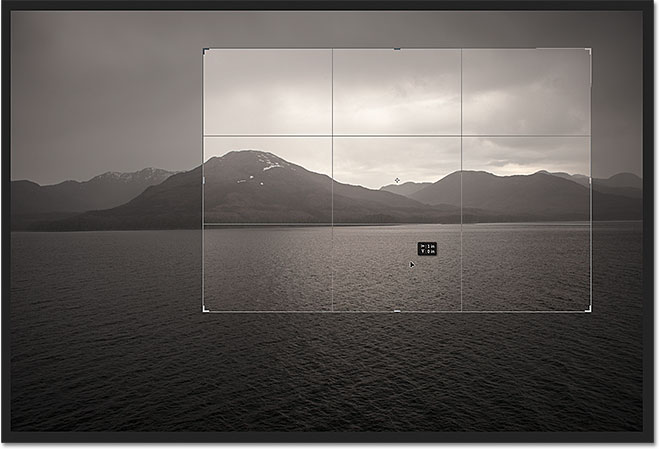
Click and drag the photo around inside the crop box to reposition it.
The Overlay
You may have noticed in the screenshots that a grid overlay has been appearing inside my crop box. By default, Photoshop CS6 shows us a 3x3 grid known as the Rule of Thirds, which states that when cropping the image, you should place the main subject of your photo at one of the spots where the horizontal and vertical grid lines intersect. Of course, that's just a general guideline that may or may not work well with your particular image.
The Rule of Thirds is just one of several different overlays in CS6 that we can choose from, and we can select them from the View option in the Options Bar:
The View option in the Options Bar.
Simply click on the words "Rule of Thirds" (or whichever overlay is currently listed) to open the menu, then choose a different overlay from the list. I'll choose the Grid overlay:
Choosing a different overlay from the View menu.
And now we can see a more detailed grid appearing inside my crop box. You can also cycle through the various overlays from your keyboard. Just press the letter O repeatedly to cycle through the list:
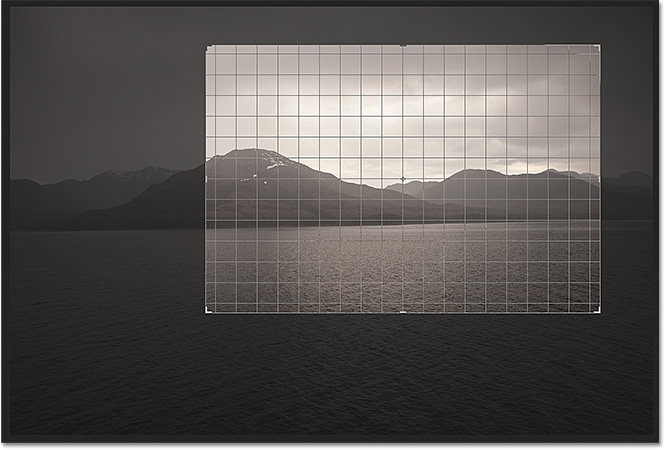
Photoshop CS6 gives us several overlays to help with cropping and positioning the image.
If you look below the list of overlays in the View option, you'll find three additional options that control when the overlay actually appears. If you want the overlay to remain on screen at all times, choose Always Show Overlay. The Auto Show Overlay option, which is my favorite, will only show the overlay while you're resizing the crop box or repositioning the image, and will hide the overlay while you're not making any changes so it's not cluttering up the screen. If you don't want the overlay to appear at all, you can turn it off by choosing Never Show Overlay:
Photoshop CS6 lets you choose when, or if, you want the overlay to appear.
Rotating And Straightening The Image
Photoshop CS6 gives us a couple of different ways to straighten an image using the Crop Tool. The first is by simply rotating the image manually. To rotate it, move your mouse cursor anywhere outside of the crop box. You'll see your cursor change into a curved line with an arrow on either end. Then, click outside the crop box and, with your mouse button held down, drag your mouse to rotate the image. The crop box will remain in place while the image itself rotates inside it. Photoshop automatically places a grid overlay inside the crop box to make it easier to judge when the image appears straight:
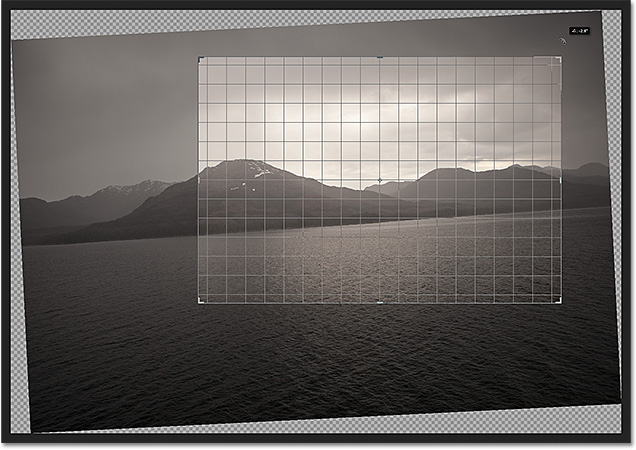
Click and drag anywhere outside the crop box to rotate the image.
Another way to straighten an image with the Crop Tool is by using the Straighten option in the Options Bar. Click on it to select it:

Clicking the Straighten option.
With the Straighten option selected, look for something in your image that should be straight, either horizontally or vertically. Click on one end of it to set a starting point, then keep your mouse button held down and drag across to the other end:
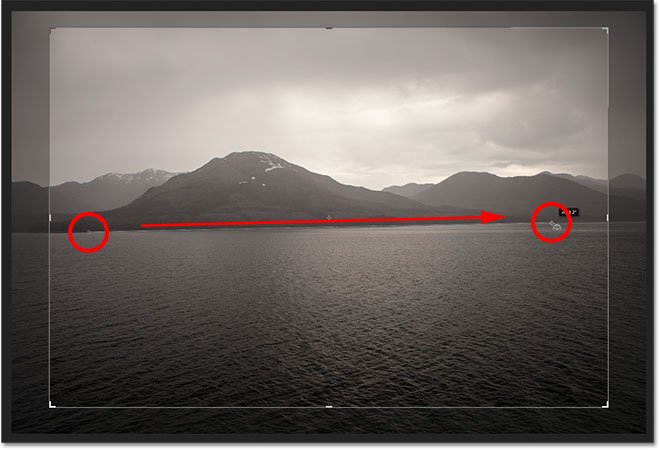
Click and drag along something that should be straight in the photo.
Release your mouse button and Photoshop instantly straightens the image for you:
Photoshop straightens the image when you release your mouse button.
Undo, Reset And Cancel
If you happen to make a mistake as you're adjusting the crop box or the image, you can undo your last step with the Crop Tool by going up to the Edit menu in the Menu Bar along the top of the screen and choosing Undo, or by pressing the keyboard shortcut Ctrl+Z (Win) / Command+Z (Mac). Or, you can completely reset everything (the crop box, the aspect ratio and any rotation you've applied to the image) by clicking the Reset button in the Options Bar:

The Reset button resets the crop box, rotation and aspect ratio.
If you change your mind and want to cancel the crop completely, click the Cancel button in the Options Bar, or press the Esc key on your keyboard:

Click the Cancel button to escape out of the image cropping.
Delete Cropped Pixels
One final and very important new feature in Photoshop CS6 we need to look at is the Delete Cropped Pixelsoption found in the Options Bar:
The new Delete Cropped Pixels option in CS6.
Selecting this option by clicking inside its checkbox will permanently delete all of the pixels you crop away. That may sound like what you'd want, but this is known as a destructive edit because it makes a permanent, physical change to your image, something you want to avoid whenever possible.
A better, more flexible and non-destructive way to work is to leave the Delete Cropped Pixels option unchecked. That way, Photoshop will keep the cropped pixels and simply hide them from view, allowing you to go back and make changes to your crop at any time! We'll see what I mean in a moment.
Applying The Crop
Once you're happy with your crop, you can apply it either by clicking on the checkmark in the options bar or by pressing Enter (Win) / Return (Mac) on your keyboard:
Click the checkmark to apply the crop, or press Enter (Win) / Return (Mac).
You'll notice, though, that even after you've applied the crop, the crop box and handles remain around the image:
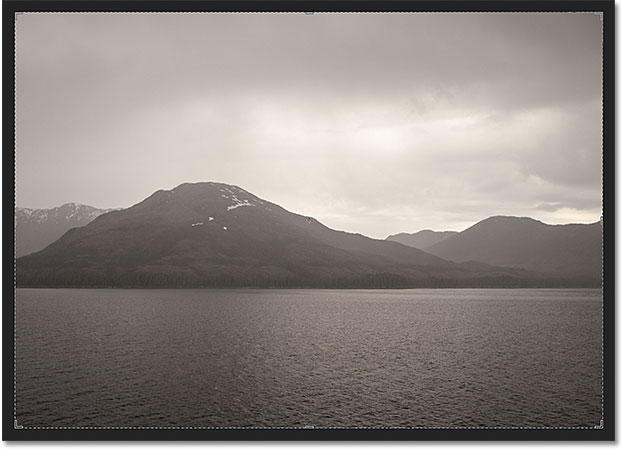
The photo has been cropped, but the crop box and handles are still visible.
To hide them and view the image on its own, all we need to do is choose a different tool from the Tools panel. The quickest way to do that is to press the letter V on your keyboard which will switch you to the Move Tool, and now the crop box and handles are no longer visible.
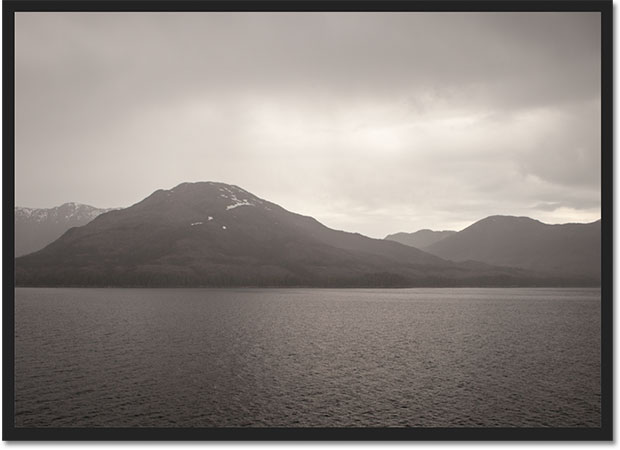
Select a different tool to hide the crop box and handles.
Editing The Crop
I mentioned a moment ago that by leaving the Delete Cropped Pixels option in the Options Bar turned off (not checked), Photoshop will simply hide the pixels that were cropped away rather than permanently deleting them. The benefit is that you can go back at any time and re-edit your crop! To do that, just select the Crop Tool again from the Tools panel. The crop box and handles will re-appear around the image. You can click and drag the handles to resize the crop box, click and drag inside the crop box to reposition the image, choose a different aspect ratio from the Options Bar, or make any other changes you need. When you're done, click the checkmark in the Options Bar or press Enter (Win) / Return (Mac) on your keyboard to accept your changes. If you save your file as a Photoshop .PSD document, you'll be able to re-open the file and re-edit your crop any time you want:
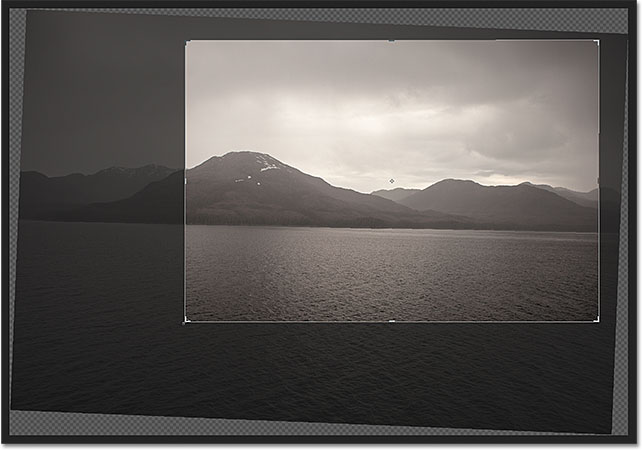
Re-select the Crop Tool to edit the crop at any time.
How to create a new Brushes Photoshop
Two basic general features that characterize brushes set limits on what can be successfully turned into a brush. And what can be a brush is almost anything.
- First is color. Photoshop uses gray scale info while defining brushes. You can make a brush out of a colorful image but converting your document to Grayscale will give you a better idea of what you are doing. Anything that is white becomes transparent (0% opacity), anything black becomes 100% opaque and any other color turns translucent (opacity somewhere between 0 and 100%).
- Second limitation is size: there is a maximum brush size possible. From Photoshop 7.0 on it's 2500 px x 2500 px (and 999 px for earlier versions). The larger the brush is created the better, so we strongly encourage you to create large brushes (ideally about 2500 px x 2500 px). The reason is you can’t increase the diameter of your brush beyond its original size without blurring.
There are plenty of ways to create a brush. You may start from a scanned image, a vector graphics,
a raster graphics or a photo.
a raster graphics or a photo.
We will guide you through a process of creating a sample brush in Adobe Photoshop CS4 from
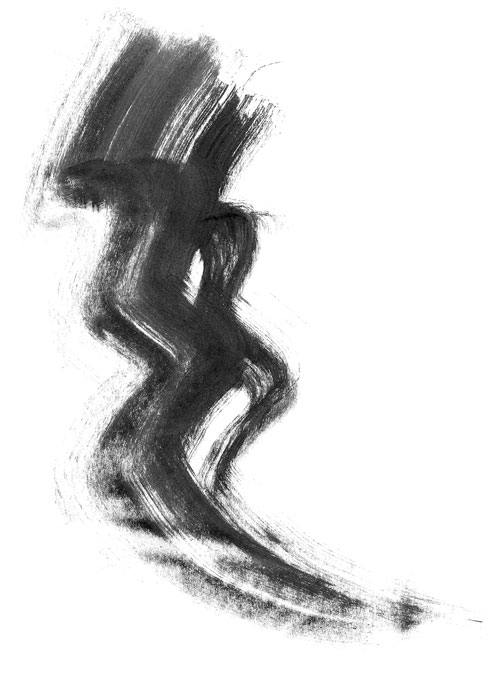
a scanned ink stroke.
a scanned ink stroke.
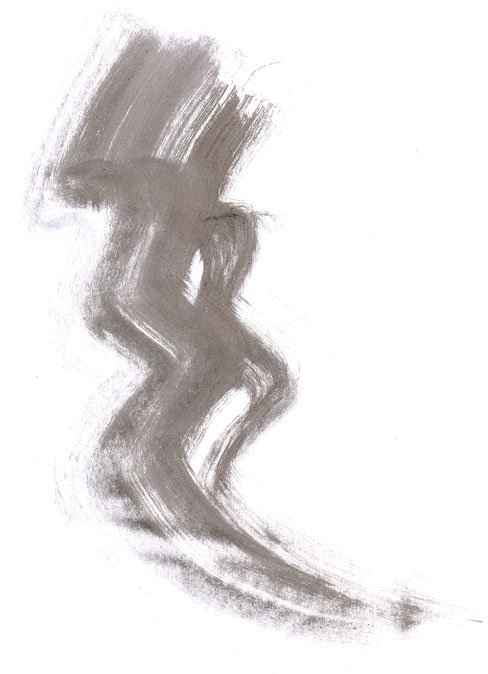
Step 1
Create a black ink stroke on a white paper and scan it. The optimum scan settings will vary depending on your scanner quality. Here, we set the resolution to 200 dpi.
Step 2
Open your scan file in Photoshop and change the color mode to 8-bit Grayscale (Image > Mode).
Step 3
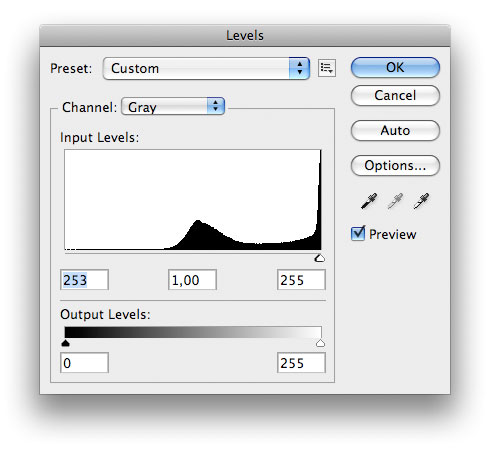
You need some time to clean the image. With your bare eye it may look ok but it’s important to always make sure that there are no artifacts. Great tools to do that are (alternatively) levels and threshold. Open the Image > Adjustments > Levels panel and drag the left slider in the Input Level panel right to the end
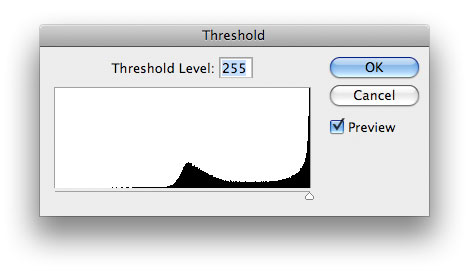
or open the Image > Adjustments > Threshold panel and drag the slider right to the end
It may happen that the background turns grey (after levels adjustment)
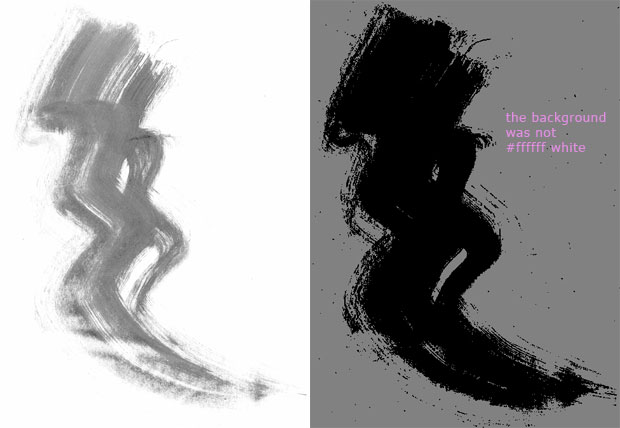
or totally black (after threshold). That means the white background is not truly white. Note, in this step always choose ‘Cancel’ - we only want to identify possible artifacts.
Step 4 (Fixing the background - if necessary)
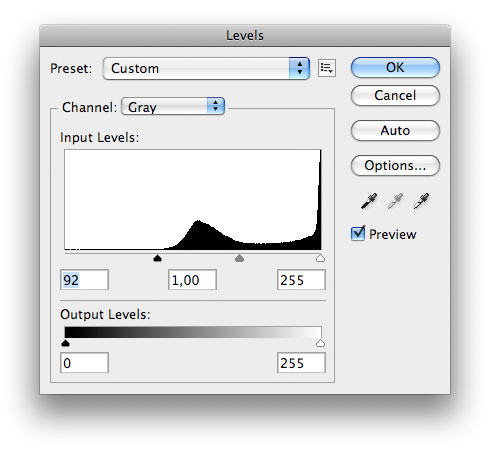
We will use Levels.
Drag the right slider in the Input Levels panel slightly left. That turns the brightest pixels white. To check if the right slider is moved enough, drag the left slider right to meet the right one. If the background stays white, the right slider position is ok. Bring the left one back to its origin.
Step 5 (Further cleaning - if necessary)
Once the background is fixed repeat Step 3. Now you can easily see plenty of very tiny ink stains all around our stroke. Some of them may add some character to you brush, but we want to get rid of the majority of them.
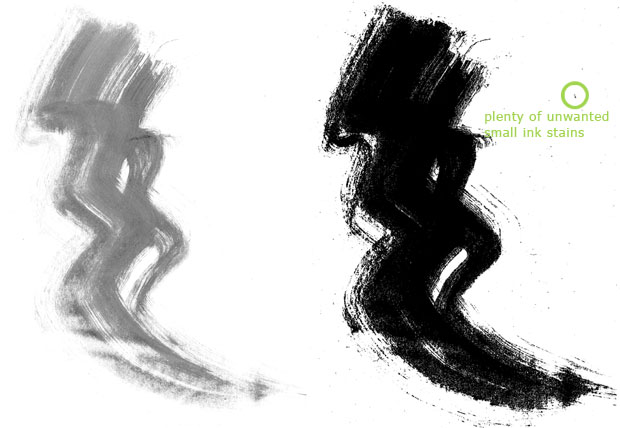
There is a trick how to do that effectively and easily. Create a white background layer. Duplicate your stroke layer and turn its visibility off. Apply levels or threshold adjustment as you did before to the stroke copy layer but this time hit the OK button. Now, create a mask and start to paint over all unwanted stains with a black brush.
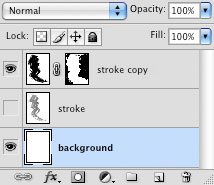
Once all of the stains are masked, drag the mask to the stroke layer, turn it on and delete the copy.
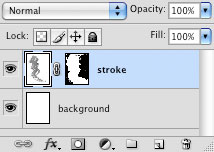
Step 6
Your stroke is now clean, you can adjust it a bit, again using Image > Adjustments > Levels (or Brightness/Contrast, Exposure, Curves, Threshold). Hit OK once you get an appearance you are satisfied with
Step 7
Now, with a stroke ready to be turned into a brush
go to Edit > Create Brush Preset. Choose a name for your brush and hit OK.

A new brush is created. You did not have to select your image since Photoshop recognizes all pixels that are not white and include them into a new brush area. However, if you select a portion of your image, only the selection will be turned into a brush.
Set Hue / Saturation Adjustment Layer in Photoshop
NOTE: This article is for older versions of Photoshop
(prior to CS6/CC), but the fundamentals still apply.

(prior to CS6/CC), but the fundamentals still apply.
There are two tools that I consider essential to working with contrast and color in Photoshop: Levels and Hue / Saturation. In a previous article, I showed you the “8 Basic Elements of a Good Color Print”. In a well-exposed image, it is quite possible that Levels and Hue / Saturation are the only 2 tools that you’ll need for working with the first 4 elements:Contrast, Color Balance, Luminance, and Color Saturation.
Oh, and for reference, here is an article I wrote previously on the “Levels Adjustment Layer”.
A quick note: I find the generic tools such as the "Brightness /Contrast" or “Color Balance” tools are too global or destructive to the image to be of any major use, so I never use them. Instead, I use Levels and Hue-Saturation in conjunction with each other, which gives me much more control, resulting in strikingly better results.
Now let’s talk about Hue / Saturation, but first, a few definitions are in order.
The 3 main attributes/components of color are Hue, Saturation, and Luminance.
1.) Hue: Hue is a single color cast or color name. Green is a hue, orange is a hue, and so on. There are an infinite number of hues …
2.) Luminance: Luminance is the amount of perceived brightness of a color. The color black has no luminance, whereas the color white has the highest luminance.
3.) Saturation: Saturation is the intensity, purity or amount of a hue.
|
The Purpose of Hue / Saturation:
The Hue / Saturation Adjustment Layer is used for color correction. More specifically, it allows you to control Hue, Saturation and Luminance for each color channel.
Hue / Saturation is great for changing the characteristics of a particular color, not your overall “global” color. When you make changes to a particular Hue, none of the other colors in your image are affected.
For instance, if the Reds in your image are too saturated, you would simply choose the “Red” Channel from the Drop-Down menu to desaturate your Reds to the desired level, without affecting any other colors in your image.
Or let's say that the Greens in your landscape shot are too Blue/Green: Choose the “Green”Channel from the Drop-Down menu, then change the Hue to bring your Greens back to a more realistic color, such as Forest Green, again without affecting any other colors in your image.
Where to Find: Three places, in order of ease of access:
1.) You can find it in the Adjustments Panel in CS4, 5 and 6, as well as Elements 7 & 8.
2.) You can click on the "New Adjustment Layer" button in the Layers Panel (the faux “Yin-Yang” button) and choose Hue - Saturation in the drop-down list.
3.) You can also go to the "Layers" menu -> "New Adjustment Layer" and choose it from that menu.
 |
How Hue / Saturation Works:
The Dialog Box (shown above for earlier versions of Photoshop) for Hue / Saturation is very intuitive:
1.) Choose the Color Channel that you want to adjust from the Drop-Down menu (you have 6 to choose from – The 3 Primary Colors, as well as the 3 Complementary Colors). By the way, I rarely use the "Master" channel. I find that I have much more control by choosing a single color channel to make changes.
2.) Adjust the Hue: As an example, choose the"Green" channel from the Drop-Down menu. Ever heard of the Color Wheel? If not, Click Herebecause you should be using it. Now you will see it in action.
~ As you move the “Hue” slider to the left, you will see the green values in your image go from a green cast to a yellow cast, then to a red cast, and finally end up with a magenta cast.
~ As you move the “Hue” slider to the right, you'll see your green values go from a green cast to a cyan cast, then to a blue cast, and finally to a magenta cast.
3.) Adjust the Saturation: Again, using the "Green" Channel as an example, move the“Saturation” slider all the way to the right and you'll see the effect of way too much saturation. Conversely, if you move the slider all the way to the left, your green values will turn to shades of black and white.
4.) Adjust the Lightness: I rarely use this slider. I personally find it ineffective. It is more effective and less destructive to adjust your Lightness with Levels and/or Curves.
Below, you will find two “real-life” examples of how to use Hue / Saturation, followed by commentary as to what was done and why.

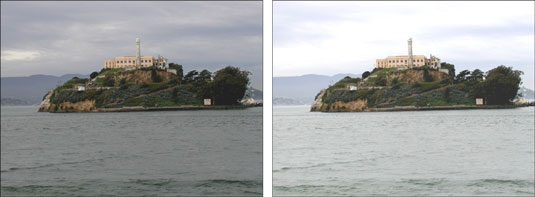
The example above is a correction for Saturation only:
The Uncorrected Image needs to be warmed up, but not globally. The color bias is showing up as too much blue and cyan in the snow, clouds and trees.
The Corrected Image is more natural looking. To achieve this, the “Cyan” Channel is desaturated, plus the “Blue” Channel is also desaturated.

This example above is a correction for Hue and Saturation:
In the Uncorrected Image, the greens are way too cool, with a blue bias. The terra-cotta pots are a bit desaturated. The rest of the image looks fine.
The Corrected Image is more pleasing. To achieve this, the “Green” Channel’s “Hue” Slideris moved to the left, and the saturation in the “Red” Channel is increased.
How to Adjust Brightness and Contrast in Photoshop
The Brightness/Contrast command in Photoshop Elements doesn’t always do a great job of brightening (making an image darker or lighter) or adding or deleting contrast. The problem with the Brightness/Contrast command is that it applies the adjustment equally to all image areas.
The Brightness/Contrast adjustment is best reserved for correcting selected areas (left) rather than the entire image (right).
If you want real horsepower when it comes to correcting the brightness and contrast (and even the color) in your image, look no further than the Levels command. You can get a taste of what Levels can do by using Auto Levels. The Levels command, its manual cousin, offers much more control.
Keep in mind that Levels can be used on your entire image, a single layer, or a selected area. You can also apply the Levels command by using an adjustment layer. Here’s how it works:
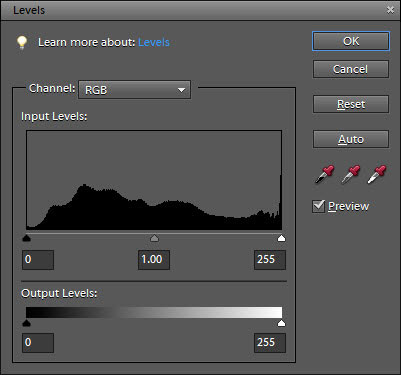
- In Edit Full mode, choose Enhance→Adjust Lighting→Levels.The Levels dialog box appears, displaying a histogram. This graph displays how the pixels of the image are distributed at each of the 256 available brightness levels. Shadows are shown on the left side of the histogram, midtones are in the middle, and highlights are on the right.
Adjust lighting levels in the Levels dialog box. - Choose Window→Info to open the Info panel.
- Set the black and white points manually by using the eyedroppers in the dialog box; first select the White Eyedropper tool and then move the cursor over the image.
- Look at the Info panel, try to find the lightest white in the image, and then select that point by clicking it.The lightest white has the highest RGB values.
- Repeat Steps 3 and 4, using the Black Eyedropper tool and trying to find the darkest black in the image.The darkest black has the lowest RGB values. When you set the pure black and pure white points, the remaining pixels are redistributed between those two points.You can also reset the white and black points by moving the position of the white and black triangles on the input sliders (just below the histogram). Or you can enter values in the Input Levels boxes. The three boxes represent the black, gray, and white triangles, respectively. Use the numbers 0 to 255 in the white and black boxes.
- Use the Gray Eyedropper tool to remove any colorcasts by selecting a neutral gray portion of your image, one in which the Info panel shows equal values of red, green, and blue.If your image is grayscale, you can’t use the Gray Eyedropper tool.If you’re not sure where there’s a neutral gray, you can also remove a colorcast by choosing a color channel from the Channel pop-up menu and doing one of the following:
- Choose the Red channel and drag the midtone slider to the right to add cyan or to the left to add red.
- Choose the Green channel and drag the midtone slider to the right to add magenta or to the left to add green.
- Choose the Blue channel and drag the midtone slider to the right to add yellow or to the left to add blue.
- If your image requires it, adjust the output sliders at the bottom of the Levels dialog box.Moving the black triangle to the right reduces the contrast in the shadows and lightens the image. Moving the white triangle to the left reduces the contrast in the highlights and darkens the image.
- Adjust the midtones (or gamma values) with the gray triangle input slider.The default value for gamma is 1.0. Drag the triangle to the left to lighten midtones and drag to the right to darken them. You can also enter a value.
- Click OK to apply your settings and close the dialog box.Your image should be greatly improved.
How to set Auto Levels in Photoshop
The Auto Levels command in Adobe Photoshop CS3 is a great way to automatically correct tonal values in a photo. Instead of manually adjusting the color levels, you can automatically brighten and even out the colors. If you need to, you can then manually adjust the levels. Follow the steps below to apply Photoshop auto levels to bring the true colors out in one of your photos.
Things You'll Need
- Adobe Photoshop CS3
Instructions
- Start Adobe Photoshop CS3 and open up a photo from your files that has dull colors or other tonal issues that need to be corrected.
- Click to select the layer that includes the photo you want to apply the auto levels to from the "Layers" palette. The layer will be highlighted when it is selected.
- Choose the "Image" menu, point to "Adjustments" and click on "Auto Levels" the colors in the photo will automatically be corrected.
- Select the "Image" menu, point to "Adjustments" and click on "Levels" to open the "Levels" dialog box. In this dialog box, you can change the input and output levels to tweak the auto levels you just applied to the photo. This allows you to get the exact tonal levels that you are looking to achieve for your photo.
- Click the "OK" button to close the "Levels" dialog box and return to your photo.
How to Convert Pictures to Grayscale in Photoshop
Most people use Adobe Photoshop Creative Suite 6 to enhance an image. This may not happen by adding distracting colors. Sometimes, grayscale is the answer instead. You can convert a color image to grayscale in a multitude of ways. Here are a few that you may want to try.
![[Credit: ©iStockphoto.com/Snowleopard 1 Image #4366735]](http://media.wiley.com/Lux/50/329150.image0.jpg)
Quick-and-dirty method
Choose Image→Mode→Grayscale. Photoshop then asks you whether you want to discard color information. Click Discard. If your image contains multiple layers, Photoshop first asks whether you want to merge your layers. If you want to keep your layers, click the Don’t Merge button.
Although this method does the job in stripping color from your image, you may be left with an image that’s flat and lacking contrast. You can apply a Levels adjustment (choose Image→Adjustments→Levels) to boost the contrast, or you can try one of the other conversion methods.
Be aware that you can no longer apply color to your image after you convert it. If you choose a color in the Color panel, the color appears gray in the foreground and background color icons. If you want to apply color to your grayscale image, convert it back to RGB or CMYK mode.
Lab Color mode method
This method most likely provides a better grayscale image than the quick-and-dirty method. Make sure that you finish all your edits that require layers before you follow these steps:
- Choose Image→Mode→Lab Color.Converting to Lab Color mode converts the channels into a lightness channel and a and b channels containing ranges of color. If you have layers, you’re prompted for whether you want to merge your layers. You can choose either option because, in Step 2, you have to flatten the image if you want to proceed with the operation.
- Choose Window→Channels. Delete the a channel by dragging it to the trash can icon at the bottom of the panel.Again, if you have layers, click OK to flatten your layers. If you select Cancel, you abort the operation.If you delete the a channel, the b channel then changes its name to Alpha 2.
- Delete the Alpha 2 channel.That leaves you with the lightness channel, which is now named Alpha 1.
- Choose Image→Mode→Grayscale.Your color image is now a grayscale one.
Best channel method
If you look at the individual channels in the image, one often stands out as being a very good grayscale image by itself.
You may find that the Red channel provides a good grayscale image when the subject is people because humans have a lot of red in their skin. Or you may find that the Green channel looks good in a scenic shot. The Blue channel rarely yields a nice image. Most of the crud picked up in a digital image finds its way into the Blue channel.
In the Channels panel, select each channel and view its contents. Find the channel that looks the best, select it, and then choose Image→Mode→Grayscale. If you have layers, Photoshop asks whether you want to flatten your layers. Click OK. Photoshop then asks whether you want to discard all the other channels. Click OK.
No comments:
Post a Comment