Add more ‘Step Backward’ undo states in Photoshop
Photoshop is a flexible software for creating complex design graphics. While designing, we use combination of tools that results into huge number of steps.
Photoshop keep record of each step you perform allowing you to revert back to any specific step. By default it displays 20 backward steps which you can undo anytime. However, while designing complex detailed graphic you may want to see more ‘Step Backward’ undo steps.
Photoshop keep record of each step you perform allowing you to revert back to any specific step. By default it displays 20 backward steps which you can undo anytime. However, while designing complex detailed graphic you may want to see more ‘Step Backward’ undo steps.
Increase ‘Step Backward’ undo history state in Photoshop
You can easily increase number of backward steps undo history states in Photoshop. If 20 states is not enough, you can bump this number to huge 1000 as per requirement.
1. Launch Photoshop program and go to Edit > Preferences > Performance. This will open Preferences box with Performance tab highlighted. Check for History & Cache section on the right side.

2. Move the slider for History States from 20 any desired level. This will make Photoshop display more ‘Step Backward’ undo steps. Click OK to save changes and there is no need to restart Photoshop to apply this setting change.
However, Photoshop restart is required if you change the number of cache levels, which are used to improve screen draw and histogram speeds. Select more cache levels for better speed and less cache levels for better quality.
Viewing more History backward steps in Photoshop
While above setting change adds more backward undo steps, this can affect overall performance of Photoshop software. Now Photoshop has to keep record of more history steps there by requiring more system resources.

To view full listing of backward steps, click on History button at top right side. You can browse whole history states of current graphic and click to go back to any listed state. You may also use keyboard shortcuts (Shift + Ctrl + Z) to Step Forward and (Alt + Ctrl + Z) to Step Backward.
More Related Reading
- How to Morph, Merge & Overlap images in photoshop?
Photoshop can be used to morph images real quick and easy. Morphing results in all new image derived from two... - How to change Opacity of images, objects in Photoshop
We can use different Opacity (or transparency) levels for different images to create cool overlap morphing effects. We have already... - Reset layout palette, keyboard shortcuts in photoshop
Number of layout windows and options can easily overwhelm a Photoshop beginner. Even intermediate users can find it difficult to... Selecting an Area in photoshop
Photoshop has multiple selection tools to accommodate the different types of selections. All of these tools are found in the Toolbox.Selecting with the Marquee Tools
Marquee tools make rectangular, elliptical, and single row or single column selections. The Marquee tools are found in the uppermost left corner of the Toolbox.To recognize this tool, look for one of these buttons:


- From the Toolbox, select and hold the Marquee Tool
The hidden Marquee tools appear.
- Select one of the tools
HINT: You can switch between the Rectangular Marquee Tool and the Elliptical Marquee Tool by pressing [Shift] + [M]. - To select an area, click and drag the the crosshair pointer to surround your desired selection
HINTS:To obtain a perfect square or circle, press and hold [Shift] before clicking and dragging the mouse. - To finish the selection, release the mouse button
NOTE: The selected area is now surrounded by animated dashes.
HINT: If your selection is not quite right, press [Ctrl] + [D] and repeat steps 2-4. - Complete the desired action (e.g., copy, add color)
NOTE: The area remains selected. - To prevent inadvertent changes to the selected area, when complete, deselect the area
 Selecting with the Lasso ToolsLasso tools make free hand selections of irregularly shaped areas, with or without straight edges. When working with these tools, the pointer takes the shape of the tool. To make the selection process more precise, you can convert it to a crosshair pointer by pressing [Caps Lock].HINT: You can switch between the Lasso tools by pressing [Shift] + [L].
Making Free Hand Selections
Selecting with the Lasso Tool is similar to drawing a line around an area with a pen.NOTE: The method used is click and drag. When you release the mouse button, the selection is completed.- From the Toolbox, select Lasso Tool

- Click and drag around the contours/border of the area you want to select
- Release the mouse button
The point at which you release will be connected with the beginning point to enclose the area.
NOTE: The selected area is now surrounded by animated dashes.
HINT: If your selection is not quite right, press [Ctrl] + [D] and repeat steps 2-3. - Complete the desired action (e.g., copy, add color)
The area remains selected. - To prevent inadvertent changes to the selected area, when complete, deselect the area
Making Straight-Edged Selections
The Polygonal Lasso Tool allows you to select oddly shaped areas of an image. You can use this tool if you want to select a triangular or other polygonal area of an image.- From the Toolbox, select the Polygonal Lasso Tool

NOTE: The Polygonal Lasso Tool is a hidden lasso tool. Click and hold the Lasso Tool button on the Toolbox to select the Lasso tool of your choice, e.g., the Polygonal Lasso Tool.
 - Position the polygonal lasso pointer where you want to start selecting and click the mouse
- Move to the next corner of the area you want to select and click
HINT: To ensure a straight line selection, press [Shift] before clicking.
A line and an anchor point appear. - Repeat step 3 until the desired area is selected
- To finish the selection, double click on the last point
ORMove the pointer to the starting point of the selection and click
NOTE: The last point you double clicked will connect to the first point you created.
HINT: If your selection is not quite right, press [Ctrl] + [D] and repeat steps 2-5.
The selected area is now surrounded by animated dashes. - Complete the desired action (e.g., copy, add color)
The area remains selected. - To prevent inadvertent changes to the selected area, when complete, deselect the area
Making Irregularly-Shaped Selections
The Magnetic Lasso Tool allows you to select particular objects out of your image without having to free hand it. The Magnetic Lasso works by detecting differences in color pixels between the area that is being selected and what surrounds it. Therefore, it works best when the color difference is significant. The Magnetic Lasso Toolworks less well if the object being selected is similar in color to its background.- From the Toolbox, select the Magnetic Lasso Tool

NOTE: The Magnetic Lasso Tool is a hidden lasso tool. Click and hold the Lasso Tool button on theToolbox to select the Lasso tool of your choice, e.g., the Magnetic Lasso Tool.
 - Position the lasso pointer where you want to start selecting and click to set the first Fastening Point
HINT: If the pointer is not in the form of a magnetic lasso, press [Caps Lock]
NOTE: Fastening Points anchor your selection border in place.
- Move the mouse along the edge of the area you want to select
It automatically draws a moveable line that "clings" to areas of similar color between Fastening Points. - To add a straight-edge selection,
- Release the mouse button
- Press [Alt] + click at the starting point of the straight-edge selection
This sets the Fastening Point for the start. - Release [Alt] and the mouse button
- Move the mouse to the endpoint of the straight-edge
- Click the mouse button
This sets the Fastening Point at the end of the straight-edge selection. Your cursor returns to theMagnetic Lasso and you can resume free hand selection.
- If the border does not automatically snap to the desired edge, click the mouse button once to add aFastening Point manually
- To erase recently drawn segments and Fastening Points, press [Delete]
- To finish the selection, double click on the last point
ORMove the pointer to the starting point of the selection and click
NOTE: The last point you double clicked will connect to the first point you created.
HINT: If your selection is not quite right, press [Ctrl] + [D] and repeat steps 2-6. - Complete the desired action (e.g., copy or add color)
- To prevent inadvertent changes to the selected area, when complete, deselect the area
 Selecting with the Magic Wand ToolThe Magic Wand Tool selects areas of similar color. To increase or decrease the range of color selected, you can adjust the Tolerance, or color range, of the Magic Wand Tool.
To select an area:
- From the Toolbox, select the Magic Wand Tool

HINT: If the Magic Wand Tool is not visible, you may need to click and hold on the Quick Selection Toolto find it. - From the Objects toolbar, in the Tolerance text box, specify a value
NOTE: Low levels of Tolerance result in a smaller selection area. High levels of Tolerance result in a larger selection area.
- To select only like-colored pixels that are next to each other, select ContiguousOR
To select all like-colored pixels in the image, de-select Contiguous - In your image, click a spot within the area that you want to select
Similar colors around the area where you clicked are selected. - OPTIONAL: Enlarge or reduce the selected area:
NOTE: These selections are also based on similar colors and may result in unintentional additions or subtractions.
a. To add to the selected area, press [Shift] while clicking areas not included in the original selection
b. To subtract from the selected area, press [Alt] while clicking areas you want to exclude - Complete the desired action (e.g., copy, add color)
The area remains selected. - To prevent inadvertent changes to the selected area, when complete, deselect the area
 Saving a SelectionFocusing on a particular area of an image is done using the selection tools; however, many times you need to work with different areas at different times. Photoshop allows you to save selection areas to make re-selecting these areas more efficient.
- Select the desired area
- From the Select menu, select Save Selection...The Save Selection dialog box appears.

- In the Name text box, type a name for the selection
NOTE: A Channel is how Photoshop saves the selection information. You can view your saved channels by clicking on the Channels tab next to the Layers tab in the Layers palette. - Click OK
 Loading a SelectionIn order to work with a saved selection, it needs to be loaded.
- From the Select menu, select Load Selection...
The Load Selection dialog box appears. - From the Channel pull-down list, choose the desired selection
- Click OKThe selection is loaded.
 Deselecting an AreaTo prevent inadvertent changes to a selected area, you should deselect it.WARNING: If you have not saved the selection, you will need to re-select the area in order to work with it again. For information on saving selections, see Saving a Selection.
- From the Select menu, select DeselectORPress [Ctrl] + [D]
Transforming Selections In Photoshop
- Here's an image I have open in Photoshop:
 The original image.I want to select the area around the butterfly, so I'll grab the Rectangular Marquee Tool from Photoshop's Tools panel:
 Selecting the Rectangular Marquee Tool.With the Rectangular Marquee Tool selected, I'll click somewhere in the top left corner of the area I want to select, then with my mouse button still held down, I'll drag down to the bottom right corner of the area to draw my initial selection outline around the butterfly, releasing my mouse button when I'm done to complete the selection:
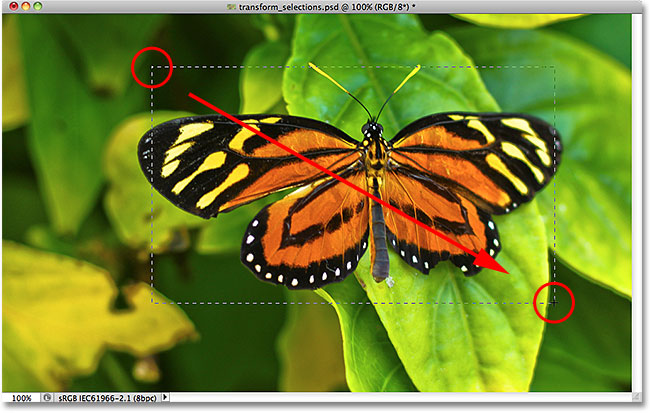 Dragging out a rectangular selection around the butterfly.Unfortunately, if we look at my selection outline, we see that I didn't do a very good job with my initial attempt. Some of the butterfly is still extending out beyond the top, left and right edges of my selection:
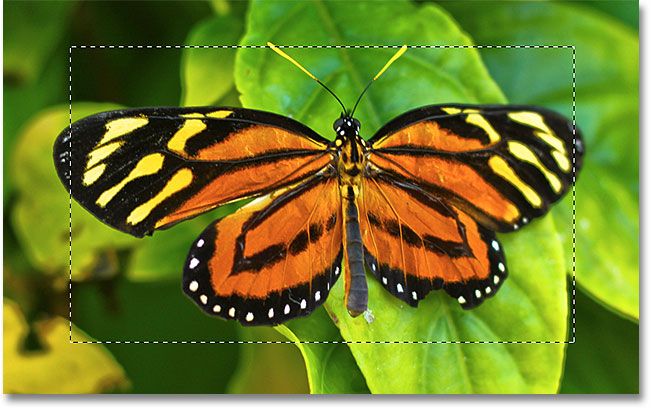 My first selection attempt didn't turn out as well as I had hoped.What many people would do in this case is undo the selection and try again, hoping they get it right the next time, but why keep starting over when we can just fix what we already have? That's exactly what we can do using the Transform Selection command.
Free Transform vs Transform Selection
Before we look at how to use Transform Selection, it's important to note the difference between it and another similar yet very different command, Free Transform. Both are used to move, resize and reshape selections. The difference is that Free Transform affects the pixels inside the selection outline while Transform Selection affects only the selection outline itself.I'll go up to the Edit menu in the Menu Bar along the top of the screen and choose Free Transform: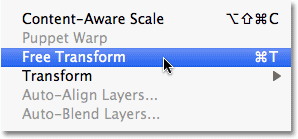 Selecting Free Transform from the Edit menu.The Free Transform command places transform handles (little squares) around the selection, one in each corner and one on the top, bottom, left, and right. We can alter the shape and size of the selection by clicking on any of the handles and dragging them. Since the butterfly's wings are currently extending out beyond the left and right edges of my selection, I'll need to make my selection wider. Watch what happens, though, when I use Free Transform to drag the left side of the selection further towards the left:
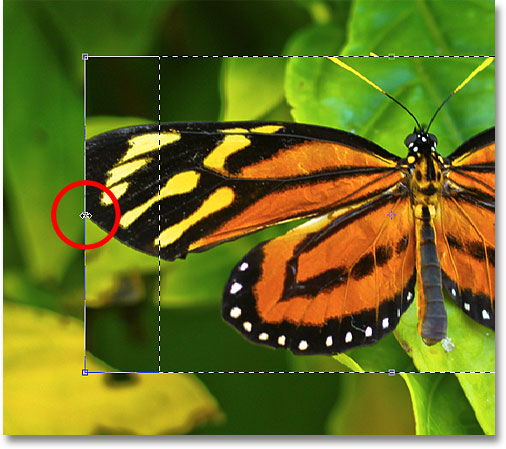 Resizing the left edge of the selection with Free Transform.Since Free Transform affects the pixels inside a selection, all I've managed to do is stretch the image itself. The selection outline, which is what I wanted to resize, didn't move, and the butterfly's wing now extends even further outside my selection than it did before. In many cases when retouching images or creating photo effects, resizing and reshaping the image with Free Transform is exactly what we want to do, but not in this case. I needed to resize my selection outline without moving anything inside the selection. For that, we'll need the Transform Selection command.I'll press the Esc key on my keyboard to exit out of Free Transform and undo the change. To access the Transform Selection command, go up to the Select menu at the top of the screen and choose Transform Selection:
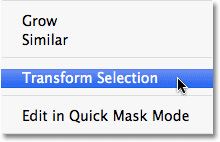 Go to Select > Transform Selection.The Transform Selection command also places the same handles around the selection, just like Free Transform did, but these handles affect the selection outline itself, not the pixels inside of it. I'll click on the left handle and drag it further towards the left, just as I did with Free Transform a moment ago. This time, I'm moving the left edge of the selection outline without moving the image. The butterfly's left wing now fits easily within my selection:
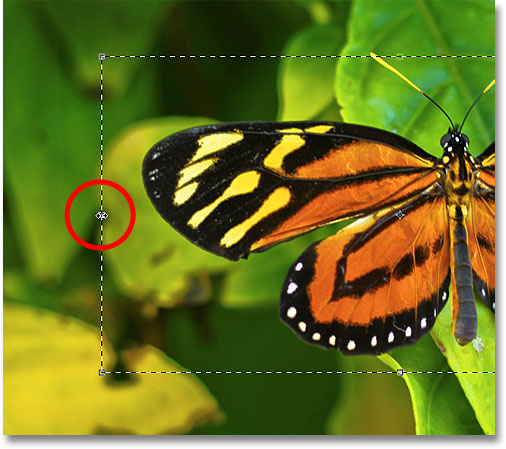 Clicking on the left Transform Selection handle and dragging it further to the left.I'll do the same thing with the right edge of the selection outline, extending it further to the right by dragging its handle:
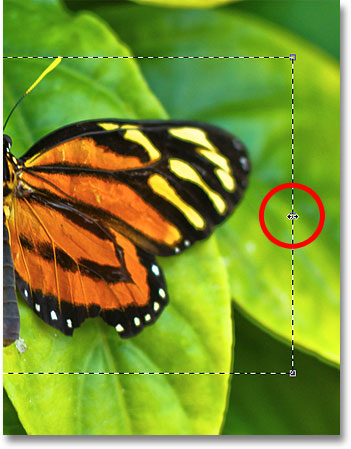 Dragging the right edge of the selection outline further to the right.I'll also click on the top handle and drag it upward to fit the top of the butterfly into the selection:
 Dragging the top Transform Selection handle.You can move and rotate the selection outline as well using Transform Selection. To move it, simply click anywhere inside the selection outline and drag it around inside the document with your mouse. To rotate it, move the cursor outside the selection outline, then click and drag. Here, I've rotated the selection outline a few degrees counterclockwise:
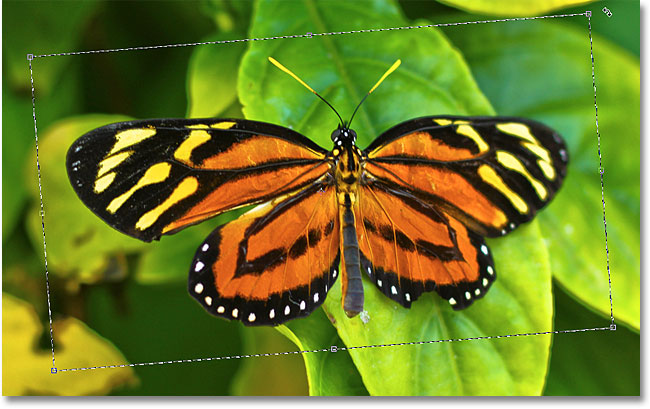 Rotating the selection outline without rotating the image inside the selection.When you're done, press Enter (Win) / Return (Mac) to accept the changes and exit out of the Transform Selection command.With my selection outline now perfectly sized and positioned where I want it thanks to Photoshop's Transform Selection command, let's do something interesting with it. I'll quickly copy the selected area to its own layer by pressing Ctrl+J (Win) / Command+J (Mac) on my keyboard:
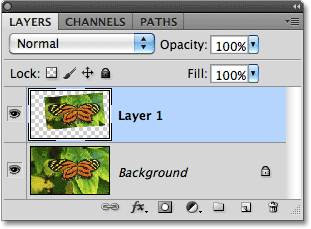 The selected area is copied to its own layer above the original image.I'll click on the Layer Styles icon at the bottom of the Layers panel:
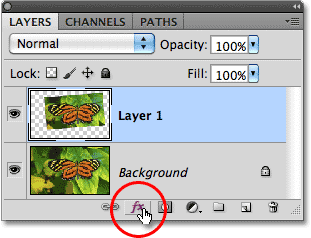 Clicking the Layer Styles icon.I'll choose Stroke from the list of Layer Styles, which I can use to place a simple photo border around the selected area, giving me a "picture in picture" effect:
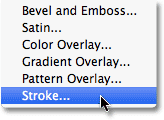 Choosing a Stroke layer style.This opens Photoshop's Layer Style dialog box with options for the stroke appearing in the middle column. I'll set the Size of my stroke to around 13 px (pixels) and change the Position to Inside, which will give my stroke sharp corners. Then I'll set my stroke color to white by clicking on the color swatch to the right of the word Color and selecting white from the Color Picker:
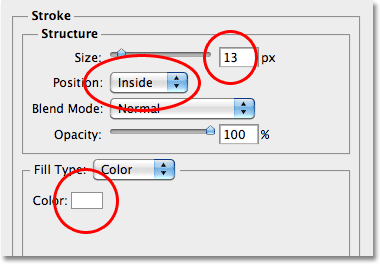 The Stroke options in the Layer Style dialog box.I'll add a shadow to the selected area as well by clicking directly on the words Drop Shadow at the top of the list of layer styles along the left of the dialog box. The middle column of the dialog box changes to show options for the drop shadow. I'll lower the Opacity down to around 60% so the shadow appears less intense, and I'll change itsAngle to 120°. Finally, I'll set the Distance to 13 px and the Size of the shadow to 10 px:
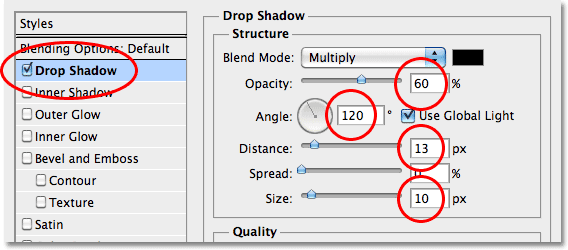 The Drop Shadow options in the Layer Style dialog box.I'll click OK to exit out of the Layer Style dialog box, and we can see the white stroke and drop shadow now applied to the selected area in the document window:
 The butterfly now appears to be in its own photo within the larger image.Finally, let's quickly convert the original image in the background to black and white. I'll click on the Background layer in the Layers panel to select it, then press Ctrl+J (Win) / Command+J (Mac) to duplicate the layer. Photoshop gives us lots of ways to convert images to black and white, including the amazing Black And White image adjustment first introduced in Photoshop CS3, but in this case, I'll just desaturate the image by pressingShift+Ctrl+U (Win) / Shift+Command+U (Mac) on my keyboard:
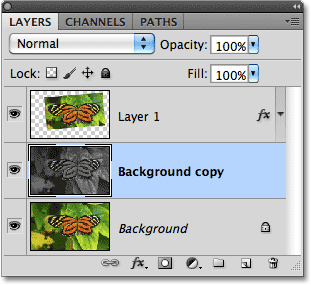 Creating a copy of the Background layer, then desaturating the copy.With the background now desaturated, here's my final "picture in picture" result which I was able to create quickly and easily thanks in large part to Photoshop's Transform Selection command:
 The final effect.
How to Deselect in Photoshop
Photoshop has a number of tools designed to allow you to select objects, including the Polygonal Lasso, Magic Wand and Rectangular Marquee tools. Each of these tools is easily accessible via the main Photoshop toolbar. How to deselect objects is somewhat less obvious. You can deselect objects by clicking menu items with your mouse or by using key combinations on your computer’s keyboard.With Your Mouse
Step 1Click the window containing the selection you’d like to deselect to ensure it’s active. Selected objects are surrounded in dotted or dashed lines.Step 2Click “Select” on the main Photoshop menu. A drop-down menu appears.Step 3Click “Deselect” on the drop-down menu. All active selection areas are deactivated.With Your Keyboard
Step 1Click the window containing the active selection you want to deselect.Step 2Press and hold the “Control” key on your keyboard.Step 3Press the “D” key on your keyboard while continuing to hold down the “Control” key. All active selection areas are deselected.Reselect or Inverse Selections in Photoshop
- You can use the Select menu commands to further modify selections by reselecting and even inversing your selections, along with a host of other options including expanding, contracting, smoothing, softening, growing, and grabbing similarly colored pixels. If that doesn’t satisfy your selection needs, nothing will.
Select all or nothing in Photoshop
The Select All and Deselect commands are no-brainers. To select everything in your image, choose Select→All or press Ctrl+A (Command+A on the Macintosh). To deselect everything, choose Select→Deselect or press Ctrl+D (Command+D on the Macintosh).Remember that you usually don’t have to Select All. If you don’t have a selection border in your image, Elements assumes that the whole image is fair game for any manipulation.Reselect a selection in Photoshop
If you sacrifice that second cup of coffee to steady your hand and take the time to carefully lasso around your desired object, you don’t want to lose your selection before you have a chance to perform your next move. But all it takes is an inadvertent click of your mouse while you have an active selection border to obliterate your selection.Fortunately, Elements anticipated such a circumstance and offers a solution. If you choose Select→Reselect, Elements retrieves your last selection.One caveat: The Reselect command works only for the last selection you made, so don’t plan to reselect a selection you made last Tuesday or even just five minutes ago, if you selected something else after that selection. If you want to reuse a selection for the long term, save it.Inverse a selection in Photoshop
You know the old song lyric: “If you can’t be with the one you love, love the one you’re with.” Well, making selections in Elements is kind of like that. Sometimes, it’s just easier to select what you don’t want rather than what you do want.For example, if you’re trying to select your beloved in his or her senior photo, it’s probably easier to just click the studio backdrop with the Magic Wand and then inverse the selection by choosing Select→Inverse.
1 comment:
Awesome article with its great important area, I have like to read it because of its natural ideology for improved information area.
Post a Comment