How to Create Layers in Photoshop
 By default a photoshop image has one layer, called Background. If you look in the Layers palette you will see something like the example on the right.
To add a new layer, go to the main menu and select Layer > New > Layer.
A window will appear like the one below. Enter a descriptive name for the layer — you can usually ignore the other options.
 The new layer will appear above the currently selected layer in the Layer palette.
Note: To rename an existing layer, double-click the layer name.
How to Create a Background Layer for Your Photoshop
There are two purposes to today's tutorial. First, to reveal the Photoshop secret handshake for creating a new background layer. Second, to show you how to create an action so that you don't have to perform the entire handshake every time you want a new background for your file.
First, a point of order. Deke prefers (possibly insists, but he's not answering my call at the moment so I get to do what I want) that one refer to the background layer as simply "a background," because it's not really a free-floating layer. It can't move up the layer stack, it can't be repositioned in the image, it's always the same size as the canvas, and it can't be transparent. For these reasons, I get what Deke is saying. But I'm afraid if I just call it "background" you're gonna envision green grass and blue skies.
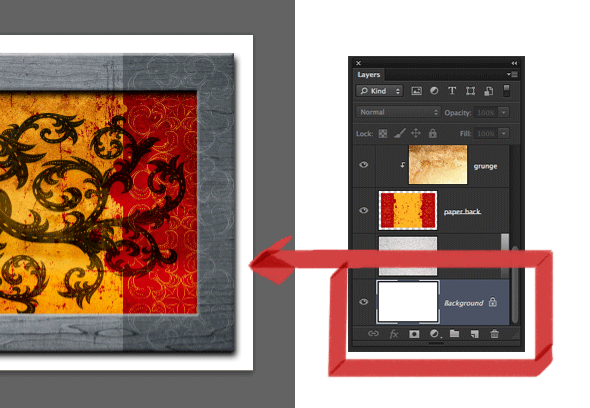
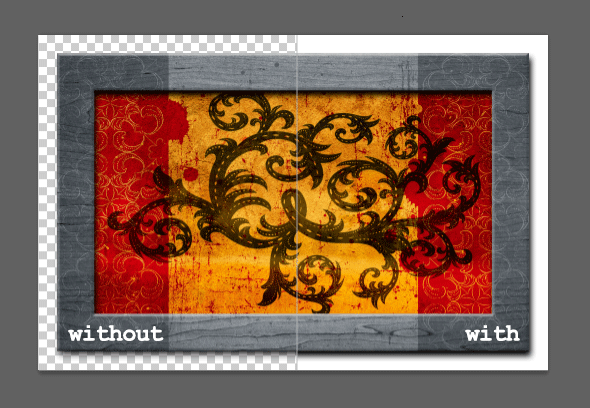
The background layer is most useful for seeing your image against a white, well, background. I'd be willing to guess that most printing of images is done on white paper, and adding the background layer allows you to assess how your image will look when you print. For instance, in the image below, it would be hard to gauge that drop shadow on the gray picture frame element if you were seeing it against a transparent background. Especially since Photoshop indicates transparency with a gray and white checkerboard pattern. But with this background layer in place, you can see (and adjust) that drop shadow accordingly.
Thing is, creating a Background from an existing layer is a little bit obtuse, in that way that Photoshop can be. Sure, it's only three steps, but I have an entire blog post to write. So, as a bonus to my instructions, I'm going to show you how to record an action that will give you a new background [layer] with a mere keystroke without remembering where that tricky command is hidden. Read to see how it works:
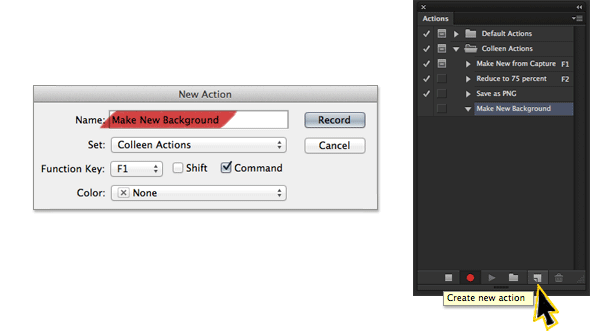
1) Create a new action. Like I said, this process is a minor annoyance, so I'm going to capture it in an action to make it less tedious. Open the Actions panel (Window > Actions, if it's not already open) and click the page icon at the bottom of the panel to create a new action. In the dialog box, name it "Make New Background" (or whatever you like). At this point, you can also assign this action to run whenever you hit a particular function key. In my case, I've set it to F1 and added the Command key to modify (because I already have another action assigned to F1 by itself). When you click Record, Photoshop starts tracking your every move and adding those actions to your Action.
 2) Make a new layer.You need create a new layer that will eventually become the background. Now normally, you probably pay attention to where in the stack your new layer is added and (of course, because you are diligent) you name your layer as you create it. But when this layer becomes the Background, its going to automatically go to the bottom and be renamed "Background." So the simplest way to create that layer is just to click the page icon at the bottom of the Layers panel and don't worry about the rest.
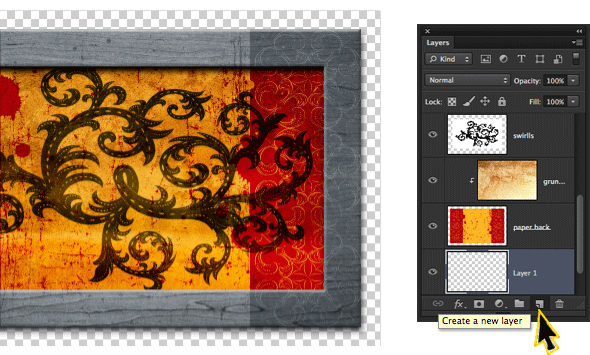
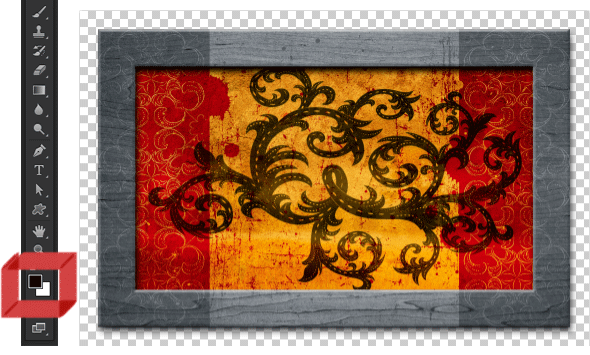
3) Set your foreground and background colors to their default settings. Nine times out of ten, you're going to want your background to be white, so that's the logical color to record your action with. If you click the D key at this point, it will set the colors to their defaults, with white as the background color. The action will record this setting, and ten times out of ten it will give you a white background. (You can always change the 10th time to your liking by hand once the action has played.)
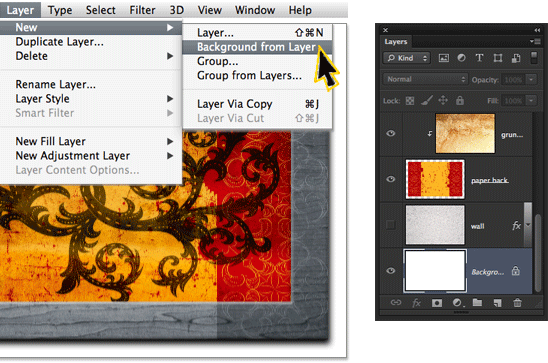
4) Change the new layer to a backgroundThis is where the secret handshake resides. Your new layer is already selected (presuming you haven't done anything tricky), so from the Layers menu, choose New > Background from Layer. (Hmm. Maybe Deke is right; it's just called Background here.) Voila, your new transparent unnamed layer goes to the bottom of the stack, fills with white, and takes on the name (and properties) of Background.
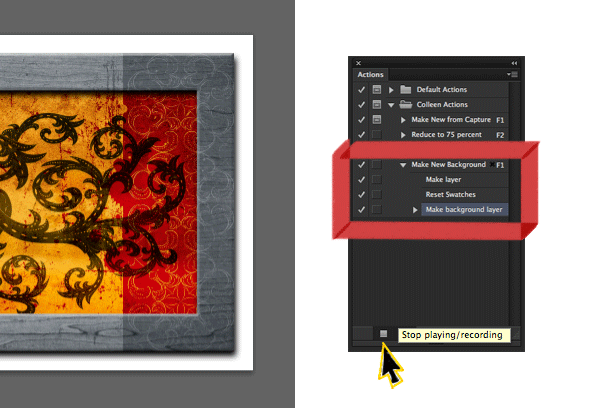
5) Enjoy your new background.Note how much easier it is to assess the drop shadow (and possibly tone it down) on the side with the white background instead of the transparency checkerboard. I mean the transparency isn't going to print, and so you might as well see what you're gonna get.
6) Stop recording.Sometimes when you're recording an action, it's easy to forget to stop. You blithely keep working and end up with a comical list of everything you've been doing for the last five minutes. (No, this has never happened to me, except always.) If you want to tweak the steps of your action without having to re-record, you can drag unwanted steps to the trashcan at the bottom of the Actions panel.
Fortunately, this time I remembered to stop recording (as far as you know.)
From this point on, you can simply press Shift-F1 (or whatever Function Key + modifier sequence you designated in step 1), and Photoshop will automatically create that handy white background for you.
Like shortcuts, actions require a little investment up front. But for sequences of things you do often, it's a real sanity- (and wrist-) saver. I've got actions like "Make from Clipboard" and "Reduce to 75%" that I use over and over, especially when making my obsessively intricate screen shots for posts like this one. What about you?
Layer via Copy or Layer via Cut in Photoshop
There are many times you will "place" a picture file inside your photoshop document, and want to resize it, put it in a different layer, or crop the image inside photoshop - but you may find a simple error message or grayed out layer via copy/cut prevents you from doing so.
To do this, you will most often do this one of three ways:
1) Select the Marquee tool and outline the area of the image you want to copy or cut
2) Go to Layer > New > Layer via Cut/Copy
3) Click Ctrl+J
Many times, you will find none of these selections work. All options will be greyed out. You may be tempted to create a new layer, and then use one of these options in the new layer. In this case, you will get the error message "Could not make a new layer from the selection because the selected area is empty." All these errors are a result of photoshop not identifying pixels that you are trying to cut/copy.
There is a simple solution to this problem. Go over to the "Layers" box, and click on the layer listing for the layer where your newly placed image resides. Make sure your image is the only item in this layer, if not relocate the image into a new layer by itself. Right-click on the layer where your photo is located in the "layers" box and click on "Rasterize Layer".
Once you do this you will now be able to follow one of the steps above to Layer Via Copy or Layer Via Cut.
Change Color in Photoshop:
When editing images, there will likely be a time that you’ll need to change the color of something in the image. Maybe the white balance is off, making orange tones look a bit too green for your liking. Or maybe someone is wearing a red shirt, but you’d really prefer it if they were wearing a green shirt. Whatever the reason, you’ll need to know how to change color in Photoshop. Luckily, this process is not as difficult as it may seem! You’re about to learn three simple ways to change the color of an object in Photoshop, using the Color Replacement Tool, Selective Color, and Replace Color.
Ready to modify colors, but aren’t well-versed in Photoshop yet? No worries! Enroll in Photoshop beginner’s course before completing this tutorial to get more familiar with the program.
The Color Replacement Tool
The Color Replacement Tool is located on your toolbar, and it looks like this:

In order to find this tool, click and hold down on the Brush Tool.
I have chosen a simple photograph of hand-picked raspberries for this tutorial. To start out, I’d recommend choosing a photograph without too many similar colors. The more complicated the photograph, the more complicated this process will be. Once you have mastered this tutorial, feel free to work on any photograph you’d like!

We are going to change the color of the raspberries. In order to use this tool, you’re going to need to set your foreground color to the color you want your raspberries to be. Take a look at the bottom of your toolbar, and you’ll see two overlapping squares – one black and one white. Click on the top square.

You’ll see a new window pop up, allowing you to choose any color you’d like. Once you have chosen your color, click ‘Ok’.

Take a look at the top of your screen. You’ll see options saying Mode, Limits and Tolerance. You’ll also see your brush options, such as size and hardness.
A useful tip: if you want to change the size of your brush easily, use the left and right bracket keys. The left bracket key ( [ ) will make your brush smaller, while the right bracket key ( ] ) will make your brush larger. Want to easily change the hardness? Simply press the same two brackets while holding down the shift key. The left bracket will make the edges softer while the right bracket will make them harder.
The Mode should be set to Color, since you’re only trying to change the color. Your Limits should be set to Contiguous, and your Tolerance you can play around with, but I have mine set at 38%. This allows me to paint over the red edges of the raspberries, yet still remain within the raspberry and not bleed out onto the hand.
Now begin to paint on the area of your photograph that you want changed.

See how they’ve changed to a more mauve color? You can use this tool on anything in your photograph that you want to change, and by changing the Mode to Hue, Saturation or Luminosity, you can change all of those aspects of the photograph as well.
Selective Color
In order to use this tool, go to Layer > New Adjustment Layer > Selective Color.

A box will pop up, all you have to do is click ‘Ok’. Now you’ll see this:

Because my raspberries are red, I’m going to keep the Colors selection on Reds. If your color is closer to something else, use that drop down tool to select Greens, Yellows, etc.
Now you can use the sliders below to change the Reds in your photograph. When you change the sliders, you can see the changes affecting your final photograph. I set my sliders to this:

And my raspberries now look like this:

If you have too many colors that are too similar in your photograph, you’ll find that this tool begins to replace parts of your photograph that you don’t want changed. If this is the case, use one of your selection tools before selecting the Selective Color Tool.
If I don’t select my raspberries, this is what will happen:

Yuck! But if I use my Magnetic Lasso Tool (the third tool down on your toolbar):  I can select the raspberries so that only they are affected.
I can select the raspberries so that only they are affected.
I click to select a point right on the edge of one of my raspberries, and then move the mouse around the rest of the raspberries back to my original point. By using the Magnetic Lasso Tool, Photoshop will naturally follow the contours of the raspberries.

Now if I make the same adjustments, you’ll see that only the raspberries are affected.

Feel free to use the Lasso Tool, Polygonal Lasso Tool, or Magic Wand to select parts of your photograph before changing the color!
Replace Color
In order to use this tool, go to Image > Adjustments > Replace Color.

You will see this box pop up:

You see how the Eyedropper Tool is selected? This tool is going to be used to tell Photoshop what color you want to replace in your image. I made sure this tool was selected, and then I clicked in the little icon of my image right on the raspberries. Now, if you have a lot of similar colors in your image, you’ll notice that having the Fuzziness Level set to 200 is going to change a lot of those colors as well. By setting that to a lower number, it will only change the color you selected. For this photograph, I set my Fuzziness to around 111. Now, you just play around with the Hue, Saturation and Lightness Sliders until you reach your desired result.

Voila! Three easy ways to replace color in Photoshop. If you’re having difficulty with any of these three ways, remember: use one of your selection tools first!! Selecting the exact part of the image that you want to replace the color of will make the process much easier.
Once you have mastered changing the color of something simple such as these raspberries, you can move on to more complicated parts of an image such as hair and skin tone. Keep practicing, and you’ll be a pro in no time!
If you’re struggling with your selection tools, have no fear. Our in-depth Photoshop course will teach you everything you need to know about selections, masks, layers and more! Want to only learn about selections? We have a course specifically designed to teach you everything you need to know about all of the selection tools available!
How to Smooth In A Photo With Photoshop
At first insert a photo:
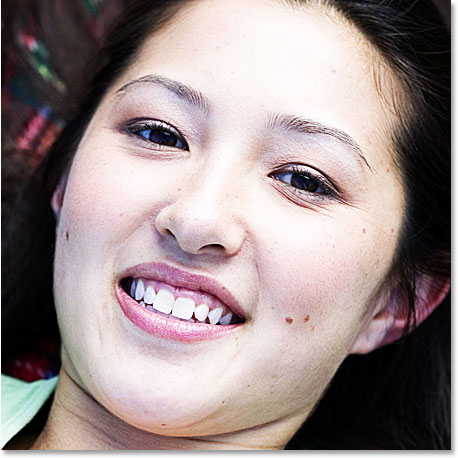
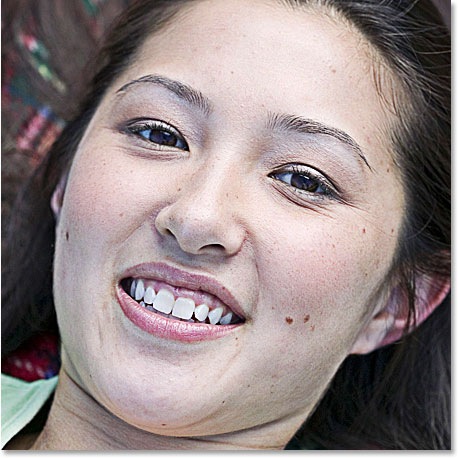
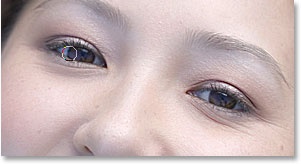
Here's the image I'll be working with in this tutorial. Since this is a tutorial on skin softening and smoothing, I've cropped away most of the image so we can focus on the young woman's face:

The original image.
Step 1: Duplicate The Background Layer
With my image newly opened in Photoshop, I can see in my Layers palette that I currently have one layer, the Background layer, which contains my original image:
The Layers palette in Photoshop showing the original image on the Background layer.
I know I say this in every tutorial, but it can't be stressed enough how important it is to leave the original image information untouched. If we lose it and we make a mistake, we have nothing to fall back on. That's why the first thing we should always do before doing anything else is make a copy of the Background layer. To do that, either go up to the Layer menu at the top of the screen, choose New, and then choose Layer via Copy, or simply use the keyboard shortcut Ctrl+J (Win) / Command+J (Mac). Either way tells Photoshop to make a copy of the Background layer, and if I look again in my Layers palette, I can see that I now have the copy, which Photoshop has automatically named "Layer 1", above the original Background layer:
The Layers palette in Photoshop now showing a copy of the Background layer, named "Layer 1", above the original.
Step 2: Change The Blend Mode Of "Layer 1" to "Overlay"
With "Layer 1" selected in the Layers palette (the currently selected layer is highlighted in blue), go up to the layer blend mode option in the top left corner of the Layers palette. It's the drop-down box that's currently set to "Normal". Click on the small down-pointing arrow to the right of the word "Normal", which brings up a list of all the different layer blend modes we have to choose from, and select Overlay from the list:
Change the blend mode of "Layer 1" from "Normal" to "Overlay".
As soon as you change the blend mode to Overlay, you'll see a big increase in contrast and color saturation in your image:
The image now appears with increased contrast and color saturation after changing the blend mode of "Layer 1" to "Overlay".
This increased contrast and color saturation can make for an interesting effect on its own, depending on the image you're using, but it's not the effect we're going for here. The only reason we've changed the blend mode to Overlay is so we can see what we're doing in the next step.
Step 3: Apply The "High Pass" Filter To "Layer 1"
To smooth and soften the woman's skin, we're going to use Photoshop's High Pass filter. If you're familiar with the High Pass filter, it's most likely because you've used it before as an advanced way of sharpening images. I say "advanced" not because it's somehow difficult or complicated to use but because it usually gives you better sharpening results than you'd get by using Photoshop's classic Unsharp Mask filter. Check out our Sharpen Images With The High Pass Filter tutorial for more information.
One of the reasons why learning Photoshop can seem nearly impossible sometimes is because we tend to get stuck on the names of things rather than focusing on what they do. For example, if you had never used the High Pass filter before and someone asked you what it does, what would you tell them? "Well, it's a filter that passes high over the image." That may sound technically impressive (sort of, I think), but what does it mean? I sure wouldn't know.
So rather than worry about the name Adobe has given to something, let's look at what it does, which is all that really matters. Before we do that though, let's bring the filter up on the screen. To access the High Pass filter, make sure you still have "Layer 1" selected, then go up to the Filter menu at the top of the screen, choose Other down near the bottom of the list, and then select High Pass:
Go to Filter > Other > High Pass.
This brings up the High Pass filter's dialog box, which is made up of a large preview area and a single option,Radius, down at the bottom. The High Pass filter looks for details in an image, such as the edges around people, objects, and so on. The reason why it's so effective at image sharpening is because it allows us to sharpen only the edges in an image while leaving everything else untouched. If my goal was to sharpen the image I'm using in this tutorial, the High Pass filter would do a great job of sharpening the woman's eyes, mouth, hair, etc., without sharpening her skin. What I want, though, is sort of the opposite of what I just described. I want to use the filter to find the edges not so I can sharpen them, but so I can smooth and soften everything except the edges.
To do that, begin dragging the slider at the bottom of the dialog box to the right until you have your Radius value set to somewhere around 6 pixels. If you're using a high resolution image, try a higher setting somewhere around9-10 pixels. As you drag the slider towards the right, if you keep an eye on the preview area in the dialog box, you'll see more and more areas of the image become affected by the filter, starting with only the finest details and then gradually expanding to include more and more of the photo. If we were sharpening the image, we would want to stick to a very low Radius value to target only the edges themselves, but for our softening effect, we need to go a bit higher:
Increase the Radius value of the High Pass filter to around 6 pixels, or try 9-10 pixels for a high resolution image.
Click OK when you're done to exit out of the dialog box. If I look at my image now in the document window, it looks like I've gone way too far with my image sharpening:
The image now appears overly sharpened in the document window.
You may be wondering why the image in the preview window of the High Pass filter's dialog box looked gray while the image in the document window didn't (and still doesn't). The reason is because in Step 2, we changed the blend mode of "Layer 1" to Overlay, and in Overlay mode, any part of the layer that is 50% gray (meaning the shade of gray you get half-way between pure black and pure white) is hidden from view. Areas that are either lighter or darker than 50% gray are blended in with the layer(s) below the layer we're working on, affecting the contrast and color saturation of the image. That may sound complicated, but don't worry if you don't fully understand how the Overlay blend mode works. We have an entire tutorial coming up on blend modes in Photoshop, so for now, all we need to know is that we changed the blend mode to Overlay in Step 2 so that we could see what we were doing with the High Pass filter in Step 3.
Our image isn't looking all that great after applying the High Pass filter, but we're going to fix that in the next couple of steps.
Step 4: Invert "Layer 1"
So far, we've used the High Pass filter to sharpen all the edge details in the image, but what we really want to do is smooth and soften everything that is not an edge detail, like the woman's skin. In other words, we want the opposite of what we currently have. We want to soften all the non-detail areas while leaving the edges alone. To do that, all we need to do is invert the layer!
With "Layer 1" still selected, go up to the Image menu at the top of the screen, choose Adjustments, and then choose Invert, or for a faster way, use the keyboard shortcut Ctrl+I (Win) / Command+I (Mac):

Go to Image > Adjustments > Invert, or press "Ctrl+I" (Win) / "Command+I" (Mac) to invert the layer.
Once you've inverted "Layer 1", take a look at your image in the document window. A moment ago, the image was suffering from an extreme amount of sharpening, but now everything appears soft and blurred-out. That is, everything except the important details in the image. The woman's eyes and mouth are slightly blurred out, but nowhere near the extent of her skin:

All the non-detail areas in the image now appear blurry while the important details have barely been affected.
Step 5: Lower The Opacity Of "Layer 1" To Fine-Tune The Amount Of Skin Softening
We've definitely succeeded in smoothing and softening her skin, but we need to take the effect down a few notches to keep things looking realistic. For that, all we need to do is lower the opacity of "Layer 1". Go up to the Opacityoption in the top right corner of the Layers palette (directly across from the blend mode option). You'll see the word "Opacity" and that it's currently set to a full 100%. Click on the right-pointing arrow, which brings up a small slider bar, and simply lower the opacity of "Layer 1" until the smoothing looks more natural. There's no set amount to lower it to since it will depend on your image, so just keep an eye on your image in the document window as you drag the slider. I'm going to lower my opacity down to about 60%. Again, your value may be different:
Lower the opacity of "Layer 1" until the smoothing and softening appears more natural.
With my opacity lowered, the softening now looks much better:
The skin softening now looks more natural after lowering the opacity of "Layer 1".
Notice how the minor amount of softening over her eyes and mouth has become almost completely unnoticeable at this point, while her skin is nice and smooth. If "almost completely unnoticeable" isn't quite good enough for you and you want to make absolutely certain there is no softening at all over those areas, continue on to the next step.
Also, throughout this tutorial I've been referring to this technique as a way to smooth and soften skin. At the moment, we're actually softening the entire photo. We haven't done anything yet to limit the softening to only the person's skin. You may very well like the effect of having the entire photo softened, and if that's the case, there's no need to remove the effect from the rest of the image. If you do want to limit the softening to just the skin, continue on.
Step 6: Add A Layer Mask To "Layer 1"
To completely remove any softening from the important details in the woman's face, I'll need to use a layer mask. To add a layer mask, again make sure "Layer 1" is selected and then click on the Layer Mask icon at the bottom of the Layers palette:
Click on the Layer Mask icon at the bottom of the Layers palette.
Nothing happens to the image in the document window, but we can see in the Layers palette that we now have alayer mask thumbnail added to "Layer 1":
The Layers palette in Photoshop showing the layer mask thumbnail.
Step 7: Select The Brush Tool
We're going to paint on the layer mask, and for that, we need the Brush Tool, so either grab it from the Tools palette or press the letter B on your keyboard to select it with the keyboard shortcut:
Selecting Photoshop's Brush Tool from the Tools palette.
Step 8: Set Your Foreground Color To Black
Since we need to paint with black, we'll need to set our Foreground color to black, since the Brush Tool paints with whichever color we have our Foreground color currently set to. By default, whenever we have a layer mask selected (which we currently do), Photoshop sets the Foreground color to white, while setting the Background color to black. We can easily swap them by pressing the letter X on the keyboard. As we can see in the Foreground and Background color swatches near the bottom of the Tools palette, we now have black as our Foreground color (the top left square) and white has become our Background color (bottom right square):
The Foreground and Background color swatches in the Tools palette.
Step 9: Paint Over The Details In The Face To Hide The Softening Effect
With our Brush Tool selected and black as our Foreground color, we can now paint away the softening effect over any areas where we don't want it. Painting with black on the layer mask doesn't actually "remove" the effect, it simply hides it from view. If we change our minds later and want to bring the effect back in areas where we've hidden it, all we'd need to do is paint with white over those areas to reveal the effect once again.
If you need more information about layer masks, be sure to check out our Understanding Layer Masks tutorial in the Photoshop Basics section of the website.
Using a small, soft-edged brush, I'll paint over the woman's eyes and mouth to completely hide the softening effect from those areas. You can change the size of your brush at any time by pressing the left bracket key on your keyboard to make the brush smaller or the right bracket key to make it larger. Also, you can control how soft or hard the edge of the brush is with your keyboard. Hold down your Shift key and press the left bracket key to make the brush edges softer, and hold down Shift and press the right bracket key to make the edges harder. Here, I'm painting over the woman's eyes with my brush:
Paint with black over the face details to completely remove the softening effect from those areas if needed.
I'll continue painting away any softening effect over her mouth, especially her teeth since we don't want them to appear soft, and maybe over the bottom of her nose and her eyebrows as well. If we look at the layer mask thumbnail, we can see all the areas where I've painted with black:
The layer mask thumbnail showing the areas that have been painted with black on the layer mask.
And here's what my image now looks like. The areas I've painted over are now completely free of any softening, even though it was very subtle to begin with:

The woman's eyes, mouth, bottom of her nose and eyebrows now no longer have any softening applied to them.
Step 10: Paint Away The Effect From The Rest Of The Image
As I mentioned a moment ago, you don't have to limit the softening effect to only the skin if you like how the effect looks when applied to the entire photo. But if you do want to limit the softening and smoothing to just the person's skin, simply use your Brush Tool and with black still as your Foreground color, paint over everything in the photo except for the person's skin.
In my case, my photo is cropped tightly around the woman's face so there isn't much else in the photo for me to paint over, but I'll go ahead anyway and paint with black around the rest of the photo. We can see by looking again at the layer mask thumbnail in the Layers palette that I've now painted with black all around her face, removing the softening effect from everywhere except her skin:
The layer mask thumbnail once again, this time showing black around everything except the woman's face, limiting the softening effect to only her skin.
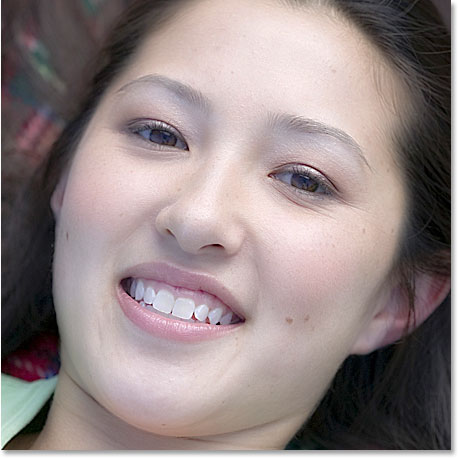
And here, with the softening and smoothing effect now being applied only to the woman's skin, is my final result:

The final result.
Brightness and Contrast in Photoshop
Very often, when we upload our pictures to the computer from the camera and first look at them on the screen, they will appear dull and lifeless like photo No.1 on the right.
In this instance the photo is under exposed, often a problem when auto flash is used with a long lens, the flash is too far away from the subject to give the proper exposure.
Here are some suggestions for altering the brightness and contrast of the image in Photoshop, use them in the order that they appear, only move on to the next method if you are not getting what you want.
Auto Levels/Contrast
There is a 'magic button' in Photoshop called 'auto levels' which you will find under the 'image' menu on the 'adjustments' sub menu.
Hitting 'auto levels' is always worth a try, it sometimes produces just the result you were looking for or, at least, a good place to start. If you don't like the result then hit the undo button on the edit menu and move on to plan B. Hitting the 'auto levels' button in this case produced photo No.2, which is not too bad.
If you tried 'auto levels' and liked the overall brightness and contrast but the color balance was worse than before then try 'auto contrast' instead. This does the same job as 'auto levels' but without altering the color.
Curves
Sometimes though, the auto buttons won't give us what we want, so we need to try something that we can control ourselves. The next weapon in the arsenal is 'curves'. Select 'curves' from the 'image->adjust' menu and we get the window below.
It may look a little intimidating at first but it is quite easy to use.
Keep the channel set on RGB to adjust all the colors at once, don't try and use this window for balancing color as there are easier ways of doing it.
When the window is first opened there will be a straight diagonal line running from the bottom left to the top right of the grid. Put your cursor on the diagonal line and a black point will appear, drag this point diagonally upwards and to the left. Look at your picture and you will notice that the mid tones of your picture are getting lighter giving you a brighter looking picture. Pull to the right and downwards and you will see the mid tones getting darker.
Used carefully this is a very powerful tool indeed but it is best used sparingly, pull the curve too much and you will get all kinds of weird effects. I often use this tool several times in succession on the picture to drag the mid tones out of the mud.
If you have extreme work to do then you can move the end anchors to change the point at which the shadows go black or the highlights go white, but normally it is best to leave these anchors where they are.
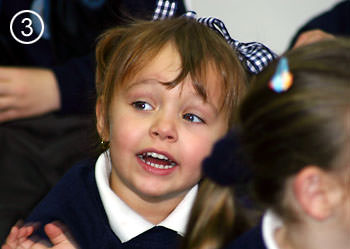
In the 'curves' window pictured above you will see I have made a small adjustment to the curve to lighten the mid tones of the photo. The result of this adjustment is shown below in photo No.3.
Compare this version of the photo with No.2 above. You will see that the highlights and shadows have changed very little and the mid tones have been lightened quite a bit. Click here to watch a video tutorial on curves.
Brightness & Contrast
A little further down the 'adjustments' menu you will find the 'brightness/contrast. . .' entry which produces the window on the left. The two sliders will adjust the brightness and contrast up or down. The difference between this window and the 'curves' window is that the effect of these adjustments is linear, in other words if you adjust the brightness by +10 then all the pixels in the picture will be 10 units brighter.
Sometimes the adjustment of these two controls can give you a better result than 'curves' but it is also easier to mess things up as well so I suggest you only use them when all else fails. You may need to use this window if, for instance, your picture needs to be brighter and it needs more contrast.
| |||||
No comments:
Post a Comment