Correcting Mistakes using the History Palette
As most of other editing software, Photoshop also uses the commandCTRL Z to undo the last operation done. However you only have ONEtime undo, using CRTL Z. The good news in Photoshop to help you correct mistakes is the History palette.
The History palette lets you jump to any recent state of the image created during the current working session. Each time you apply a change to an image, the new state of that image is added to the palette.
To revert to a previous state of the image click the name of the state on the History palette
Here are some guidelines to help you use the History palette:
1. Changes done to Photoshop's display interface, like preferences and palette settings are not recorded in the History palette. Only changes applied to your document will be collected in the palette.
2. By default the History palette records the previous 20 states, older states are automatically deleted in order to free memory for photoshop.
3. Once you close and re-open a document, all states and snapshots of the last session are cleared from the session
4. States are added from the top down.
5. Each state is listed with the name of the tool or command used to edit the image.
To reverse all changes made to the image since it was last saved:
Choose File > Revert, and click Revert.
Creating Type On A Path In Photoshop
Photoshop lets you add horizontal and vertical text easily to your images. One of the most exciting ways to use type is to wrap it around a path. You can add the type to an open or closed path you’ve drawn with the Pen tool or to a shape such as the rectangle, ellipse or polygon and the Custom Shape tool offers literally hundreds of vector shapes to play with. When you attach text to a path, both the
text and the path remain editable, so you can reshape the path and resize or recolor the text as you want. Here’s how to do it.
Here’s how to attach text to a custom shape:
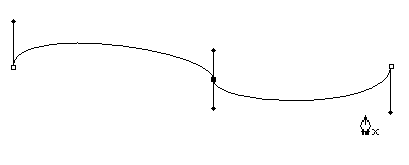
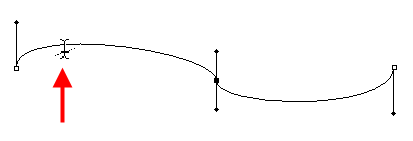
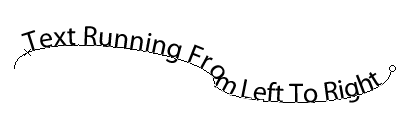
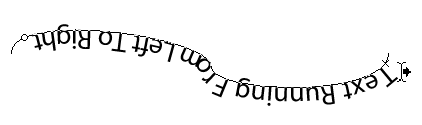
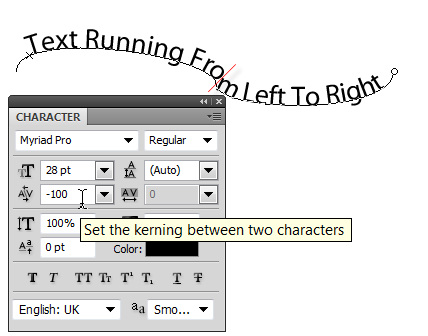
1. Draw a path using the Pen tool. The direction you draw the path determines which direction the text will flow.
2. Select the Horizontal Type tool from the toolbox and then hover your cursor above the path edge. You’ll see a wavy line appear beneath the I-beam cursor. This tells you that it recognizes the path you’re about to attach the text to. Click once and then start typing.
3. You can use any of the alignment buttons in the Options bar or Character panel to align the text on the path.
4. You can slide the text back and forth along the path, or flip it from the top of the path to the bottom, using the Path Selection tool (the black arrow below the Type tool) to select it.
When a tiny, right-facing arrow appears next to your cursor, drag to the left or right to move the text. To flip the text to the opposite side of the path drag your cursor below the path.
If your text disappears, that means the space between the start and end points is too small to hold all of your text. You can fix this by adjusting one of the points or change the text size to make it fit.
Just switch back to the Type tool or double-click the Type layer’s thumbnail in the Layers panel and then make a selection.
5. Sometimes the letters will appear too close together and you may need to adjust the Kerning of individual letters or the Tracking of all letters in the Character panel to stop them colliding in tight spaces.
6. To make the text sit above or below the path rather than directly on it, adjust the baseline shift in the Character palette.
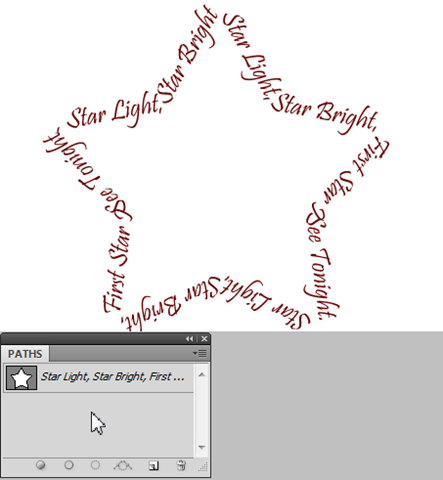
7. The Custom Shape tool offers tons of shapes to play around with. Select the Custom Shape tool from the toolbox. It is hidden under the Rectangle shape tool. On the tool options bar, set the Custom Shape option to Path and on the Shape drop down box, choose a Star shape. If you can’t see a Star shape choose Shapes from the Context Sensitive menu (small triangle).
8. Drag out the Star shape, then use the Horizontal Type tool to add some type. I used Pristina, size 28 set in red.
9. When you’re finished, you can hide the path by clicking anywhere on the grey area of the Paths palette. Now all you’ll see is your text appearing in a star shape.
Adobe Photoshop CS3
Feathering a Selection
Feathering is Photoshop's term for "soft edges." Creating a soft edge around a selection is a nice way to blend images, highlight an object within an image, or adjust harsh edges for web graphics. This document explains two ways of feathering an image in Photoshop.
- Feathering a Selection
- Feathering a Selection Using Inverse
 Feathering a Selection Feathering a Selection
Feathering a selection blurs the edge of the selection. The selection can then be copied and pasted to create a new image or copied and pasted onto an existing image to create a composite image.
Using a selection tool, make your selection HINT: Leave a little room along the edges for the feathering action. It feathers on both sides of the selection border. 
From the Select menu, select Modify » Feather... ORPress [ Alt] + [ Ctrl] + [ D] The Feather Selection dialog box appears. 
In the Feather Radius text box, type your desired feather pixel value
RECOMMENDED: Select a number between 5 and 10 for best results with resolution values around 72 ppi. The higher the image resolution, the higher the allowed feather radius value.
Click OK
You can now copy and paste your selection to a new image or an existing image
NOTE: Paste the selection onto a new image with a transparent background if you are planning to move it to another image.
Feathering a Selection Using Inverse
If you want to feather only a part of an image, use the Inverse function. The Inverse function simplifies the process of deleting the background detail. You have to select what you want to keep and then invert the selection by using the Inverse function; all details surrounding the selection will be selected. The feathered selection remains on a plain background. You may want to use this to create a composite image.
Using a selection tool , make your selection HINT: Leave a little room along the edges for the feathering action. It feathers on both sides of the selection border.
From the Select menu, select Modify » Feather... ORPress [ Alt] + [ Ctrl] + [ D] The Feather Selection dialog box appears.
In the Feather Radius text box, type your desired feather pixel value
RECOMMENDED: Select a number between 5 and 10 for best results with resolution values around 72 ppi. The higher the image resolution, the higher the allowed feather radius value.
Click OK
From the Select menu, select Inverse
OR
Press [Shift] + [Ctrl] + [I]
Press [ Backspace] The detail surrounding the selection is deleted, leaving only the feathered selection. 
How to Create a New Pattern in Photoshop
In Adobe Photoshop Creative Suite 6, you can create your own pattern, basing it on an existing image or one you create yourself. Select a small portion of an image to build an abstract pattern or use a recognizable object to define that object as a pattern stamp. You can use anything, from a logo to your signature, as a pattern.
To create your own pattern, follow these steps:
Open the image that contains the area you want to use as a pattern or create an image from scratch.
Make any modifications to the image to produce the exact pattern that you want.
Use the Rectangular Marquee tool to select the area you want to convert into a pattern.
If you don’t make a selection, Photoshop uses your entire image as a basis for the pattern.
If you’re using a selection to define your pattern, you must use a rectangular selection. You can’t use a feathered selection of any kind.
Choose Edit→Define Pattern.
Enter a name for your pattern in the Define Pattern dialog box.
Your new pattern appears in the Pattern panel for use.
Photoshop layer styles are a popular way to add effects, such as drop shadows and strokes, to layers in a non-destructive way. With the right knowledge and experience, any effect can be achieved. To achieve these effects, however, you need to understand what each setting does and how they can be combined to create a certain look. In this series by John Shaver from Design Panoply, we will explain every aspect of Photoshop's layer styles feature and show you how to unlock their potential.
In this article, Part 10: How to Apply Pattern Overlays Using Photoshop Layer Styles, we will explain the settings behind Pattern Overlay and the ways it can be used to create different effects. Let's get started.
The Uses for Pattern Overlay
Pattern Overlay is used, as the name implies, to add a pattern to a particular layer. Using Pattern Overlay in conjunction with other effects can help you create styles with depth.
The Layer Styles Pattern Overlay Dialog Box
Pattern Overlay doesn't have a ton of options, but that's because it's more of a "On/Off" effect, unlike some of the others that can be manipulated to drastically change the way they look.
Blend Mode
The Blend Mode allows you to set the blending mode for your Pattern Overlay. The default setting is Normal, which simply displays a pattern on your layer. If you are unfamiliar with how all the different Blending Modes work, I highly recommend checking out the Blending Is Fun Basix tutorial.
In the following example, you can see how changing the Blend Mode from Normal to Linear Burn makes our striped pattern turn from solid white and red into transparent and dark red.
Opacity
The Opacity sliders controls how see-through our Pattern is. A smaller number here makes your Pattern Overlay more transparent, while a higher number is more opaque.
In the following example, you can see that a lower Opacity makes our pattern slightly transparent, with the black color of the text showing through.
Pattern
This is where you choose your pattern. Photoshop comes with a lot of default patterns, but you can also create your own.
To create your own pattern simply open an image in Photoshop, press CTRL + A to select the entire canvas, and click Edit > Define Pattern. You will then find it in the list of patterns within the Pattern Overlay dialog.
The small icon next to the pattern swatch will create a new preset using the currently selected pattern.
Additionally, the Snap to Origin button will allow you to align your pattern with the layer it is applied to.
You can also click and drag in your document while the Pattern Overlay dialog is open to manually position your pattern.
In the following example, you can see how changing the Pattern while leaving other settings unchanged affects our style.
Scale
You can resize you pattern by increasing or decreasing the Scale slider. Photoshop doesn't do a very good job at resampling patterns within the Layer Styles dialog, so it's usually best to use numbers like 10%, 25%, 50%, etc.
Checking the Link with Layer checkbox locks your pattern to the layer so that if you move your layer around later, the pattern follows. If you uncheck this box and move your layer, the pattern does not move.
In the following example, reducing the Scale of the pattern gives it more detail, because more of the pattern is showing. The effect is more prominent when using more detailed patterns.
Sharpening Part of an Image in Photoshop
- Create a duplicate layer to use for sharpening and change its blend mode to Luminosity.
If you’re dealing with a single-layer file, select the original layer and then press Command-J (Ctrl+J on a PC) to duplicate it. If you’ve got a multilayered file, combine your layers into a single sharpening layer (explained at the end of this article). Use the pop-up menu at the top of the Layers panel to change its blend mode to Luminosity and, if you’d like, double-click the new layer’s name and rename it Sharpen.
- With the new layer selected, choose Filter > Sharpen > Unsharp Mask.
Enter an Amount of 120 percent, a Radius of 2, and a Threshold of 3. These numbers are rather arbitrary; the goal is to severely oversharpen your image so you can scale back the effect.
- Run the Unsharp Mask filter two more times.
Have a little faith, will ya? You’ll reduce this extreme oversharpening in a minute. To run the filter again, press Command-F (Ctrl+F on a PC) or choose Filter > Unsharp Mask (the last filter you ran always shows up at the top of the Filter menu).
- Add a solid black layer mask to the sharpened layer.
At the bottom of your Layers panel, Option-click (Alt-click on a PC) the circle-within-a-square icon to add a layer mask filled with black, which hides the sharpened layer. (In the realm of layer masks, black conceals.)
- Grab the Brush tool and set your foreground color chip to white.
Press B to activate the Brush tool and take a peek at the bottom of the Tools panel. If the foreground color chip is white, you’re good to go. If it’s not, press D to return the color chips to the factory setting of black and white and then press X to flip-flop the chips.
- Mouse over to your image and paint your subject’s irises.
When you’re doing detail work like this, it’s helpful to zoom in on the image by pressing Command+ (Ctrl-+ on a PC) a few times. You also need to adjust your brush size: Press the left bracket key ([) to make your brush smaller and the right bracket key (]) to make it bigger. Be sure to paint only the iris of each eye. If you mess up and reveal too much of the sharpening layer, don’t panic; just press X to flip-flop color chips so you’re painting with black and then paint over that area to hide the sharpening.
Tip: You can also drag to change your brush size by holding Ctrl-Option as you drag left or right with your mouse (on a PC, Alt+right-click and drag).
- When you’re finished painting the eyes and you’re still zoomed in, hold the space bar and drag to move the image so you can see your subject’s lips and reveal the sharpening in that area, as well.
Painting over your subject’s lips is like adding a bit of digital lip gloss. You’ll probably want to increase your brush size a bit.
- Lower the Sharpen layer’s opacity until you get a realistic effect.
At the top of the Layers panel, change the Opacity field to approximately 50 percent to lessen the effect of the sharpening you applied in step 3.
- Save the image as a Photoshop (PSD) file.
With this method, you’re not harming the original pixels, and you can alter the layer’s opacity to lessen the effect and make it look real instead of otherworldly. Saving the document as a PSD file lets you go back and edit the layer mask or change the sharpened layer’s opacity, which is a great option if you print the image and think, “If only it was just a hair sharper…”
The Sharpen Tool
What’s all this talk about sharpening with filters? Why can’t I use the Sharpen tool instead?
Just because Photoshop has a certain tool doesn’t mean you should use it. While it seems like a no-brainer that the Sharpen tool would be your best bet for sharpening (it’s specifically designed for that, right?), you can actually get better results using other methods. That said, since Photoshop CS5: The Missing Manual covers all of Photoshop, here’s a quick primer on how it works:
The Sharpen Tool is part of the Blur toolset. When you click its icon (which looks like a triangle) and mouse over to your image, you see a familiar brush cursor. With the Sharpen tool, you can paint areas you want to sharpen and, well, that’s it. Up in the Options bar, you can adjust the following settings:
- Brush. This menu lets you pick brush size and type (big or small, hard or soft).
- Mode. In this pop-up menu, you can change the tool’s blend mode from Normal to Darken, Lighten, Hue, Saturation, Color, or Luminosity.
- Strength. This field is automatically set to 50 percent. But unless you want to oversharpen your image, lower this setting to 25 percent or less before you use it. That way, you apply reasonable amounts of sharpening and can continue to brush over areas to apply more.
- Sample All Layers. Photoshop assumes you want to sharpen only the current layer. If you want to sharpen all the layers in your document (or rather, the ones that you can see through the current layer, if it’s partially transparent), turn on this checkbox.
- Protect Detail. New in CS5, this option prompts Photoshop to be extra careful about what it sharpens (technically, it triggers a new set of sharpening instructions called an algorithm). Sure it’s an improvement and it could be rather handy if you need to sharpen a small area quickly without fussing with Smart Filters or a duplicate layer. But the extra thinking Photoshop has to do means it runs like molasses on large images.
As you might imagine, using this tool can be a time-suck of epic proportions because you’re sharpening with a brush by hand, so it’s best to use it only on small areas.
Sharpening Layered Files
When you run a sharpening filter, it affects only the current layer—there's no way to make it affect all the layers in your document. So what happens if your image is on more than one layer? (Say you've combined several images and added several Adjustment layers.) The solution is to merge all those layers into a brand-new one you can sharpen.
Here's how:
- Open a layered file and select the topmost layer.
Since the sharpening layer needs to be on top of your layer stack, select the top-most layer; that way, the new sharpening layer appears above it, which is exactly where you want it.
- Make sure you've turned on the visibility eyes of the layers you want to merge.
- Open the Layer panel's menu by clicking the upper-right part of the Layers panel and then Option-click (Alt-click on a PC) the Merge Visible menu item.
If you simply click Merge Visible, Photoshop compacts all your layers into one. But by Option-clicking (Alt-clicking) the Merge Visible option, you tell Photoshop to compact all your layers onto a completely new layer at the top of your layers stack. You can also press Command-Shift-Option-E (Ctrl-Shift-Alt-E) to do the same thing.
Now you can sharpen the new layer using any of a number of methods, including the one described above.
How to Stroke a Selection in Photoshop
Stroking in Photoshop CS6 enables you to create outlines of selections, layers, or paths. Stroking a selection creates a border around the selection. It’s up to you to decide whether to put the border inside, outside, or centered on the selection. (Photoshop doesn’t care.)
To stroke a selection, follow these steps:
In the Tools or Colors panel, choose a foreground color and make a selection of your choice.
Choose Edit→Stroke.
In the Stroke dialog box, adjust the settings and the options.
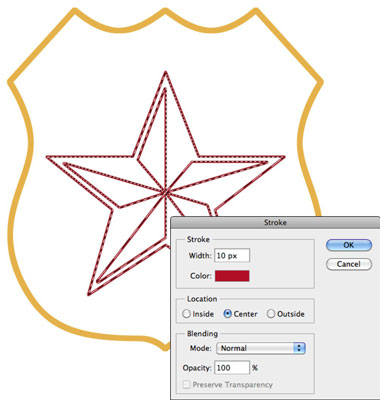
Width: You can select 1 to 250 pixels. You can also type a value by using another measurement, such as inches, but Photoshop converts it to pixel values before applying.
Color: Click in the Color box to select the hue you want from the Color Picker.
Location: Select where Photoshop should apply the stroke in relation to your selection border. The Inside option always gives you sharp corners on a rectangle. The Center and Outside options can result in blunt, mitered corners.
Mode: This determines how the stroke color merges with other colors on the same layer.
Opacity: The default value is 100%. If you want the stroke to be semitransparent, type another value.
Preserve Transparency: Select this option to apply the stroke only to nontransparent pixels.
Click OK to apply the stroke.
It’s recommended leaving the Blending Mode and Opacity setting options in the Stroke dialog box alone. Instead of adjusting these settings, create a new layer for your stroke and then choose different Blending Mode and Opacity settings in the Layers panel. This approach maximizes your ability to make edits.
|
 The graphic to the right displays the layer palette of the document on the left.


No comments:
Post a Comment