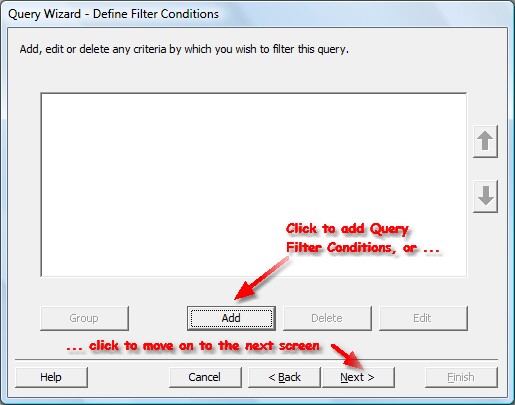
|
Once you have defined your Query Filter Conditions click on the 'Next >' button to move on to the Query Wizard - Select Fields form.
Creating a Find Duplicates Query
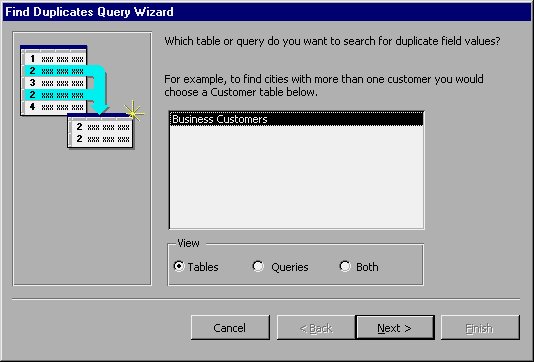
You can also use the New Query dialog box to create a Find Duplicates query, which lets you quickly search a table for duplicate fields. Select the Find Duplicates Query Wizard option in the dialog box and click your mouse on the OK button. Access, in turn, displays the Find Duplicates Query Wizard dialog box shown in Figure 6-14.
Figure 6-14 The Find Duplicates Query Wizard dialog box.
In this dialog box, Access lists the data sources you can use for this query. Typically, you would use a table as your data source, but with this Wizard you can also use another query. Because the Business Customers table is the only item in the Customers database, Access has already selected this table for you. You can click your mouse on the Next button to move to the dialog box shown in Figure 6-15.
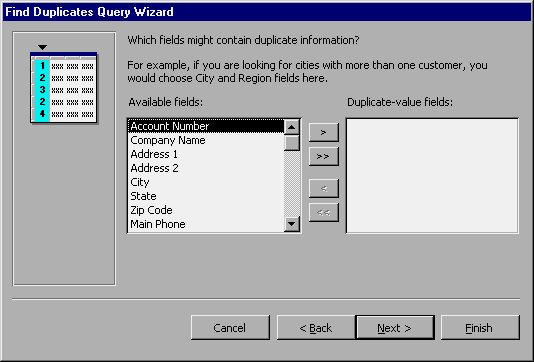
Figure 6-15 Selecting a field to check.
In this dialog box, Access asks you which fields you want to check for duplicate values. Although there is no limit to the number of fields you can have your query check, you should select only those fields necessary to ensure there are no duplicates. The more fields you ask your query to check, the longer it will take to run. In the case of the Business Customers table, you will probably only need to check the Company Name and Contact fields to determine if there are duplicates.
First, select Company Name and click your mouse on the > button. Next, select the Contact field and click your mouse on the > button. Access then displays the two fields, in order, in the list at the right side of the dialog box. After you specify these fields, click your mouse on the Next button. Access displays the dialog box shown in Figure 6-16.
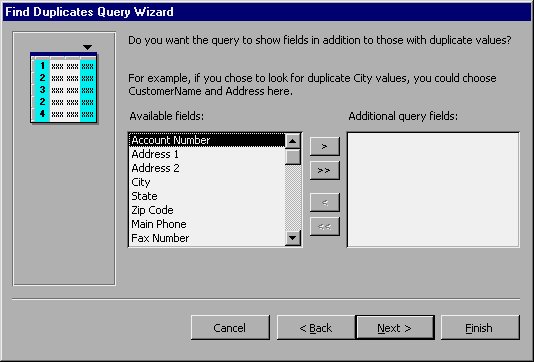
Figure 6-16 Displaying additional information.
In this dialog box, Access asks if you want your query to display any additional information. When you review duplicate records, you can use this information to help you determine which ones you want to save and which you want to delete. For the Business Customers table, you may want Access to display the Contact Phone, Last Order, and Salesperson fields. Select a few of these fields (remember to click your mouse on the > button after you highlight each one). Access adds each field's name to the list at the right side of the dialog box. When you finish picking your fields, click your mouse on the Next button. Access displays the dialog box shown in Figure 6-17.
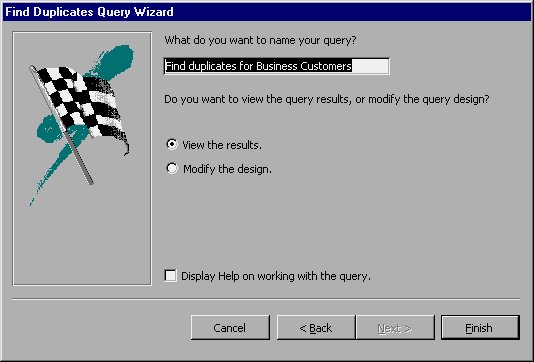
Figure 6-17 Finishing up the query.
Now that you have finished creating your query, Access asks you to give it a name. Since the Wizard's suggested name for this query is quite descriptive, click your mouse on the Finish button to tell Access you accept it. Access saves your query under this name and updates the query list in the Database window. Access opens the query to show you the results of your work. Figure 6-18 shows an example of how this query should turn out.
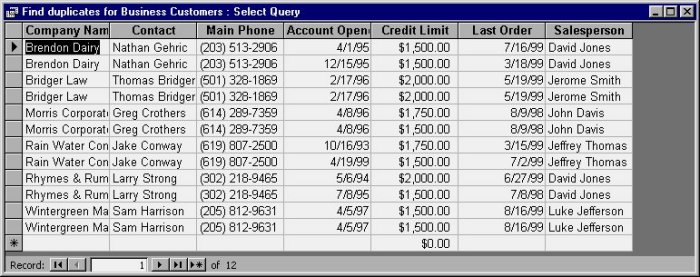
Figure 6-18 The results of the Find Duplicates query.
You can now review the duplicates and decide what you want to do with each of them. If you delete any record in the display, Access will delete the corresponding record in the underlying table (Business Customers). For this reason, Find Duplicates queries can be very helpful in managing the information in your table.
Modify a Find Unmatched Query to compare by more than one field
Open the query in Design view.
In the query design grid, note that the two tables are joined on the fields that you specified on the third page of the Find Unmatched Query Wizard. Create a join for each remaining pair of related fields by dragging them from the first table (the table that has unmatched records) to the second table. For example, drag the List Price field from the Products table to the Unit Price field from the Order Details table.
Double-click a join (the line connecting the fields) to display the Join Properties dialog box. For each join, choose the Join Properties option that includes all the records from the first table, and then click OK.
In the query design grid, note that each join now has an arrow at one end.
1. When you create the join between the List Price and Unit Price fields, by default the join restricts output from both tables. Only those records with matching data in the fields in both tables are included in the query results.
2. After you edit the join properties, the join only restricts the table that the arrow points to. All records in the table that the arrow points from are included in the query results.
NOTE Make sure that all of the arrows on the joins are pointing in the same direction.
For the table that has related records (in this example, the Order Details table), double-click each field that is joined to the first table, except for the field that you chose on the third page of the wizard (in this case, the Product ID field). For each of these fields, clear the check box in the Show row, and type Is Null in the Criteriarow.
Optionally, add criteria to the other query fields, or create calculated fields that are based on values from the first table.
On the Design tab, in the Results group, click Run.
The query returns the names of products that are not part of any existing orders.
Create your own query to find unmatched records
On the Create tab, in the Other group, click Query Design.
In the Show Table dialog box, double-click the table that has unmatched records, and then double-click the table that has related records.
Close the Show Table dialog box.
In the query design grid, the two tables should have lines, called joins, connecting them by their related fields. If the joins are not there, create them by dragging each related field from the first table (the table that has unmatched records) to the second table (the table that has related records).
Double-click a join to open the Join Properties dialog box. For each join, choose option 2, and then click OK.
In the query design grid, the joins change so that they have arrows at one end.
NOTE Make sure that all of the joins are pointing in the same direction. The query will not run if the joins point in different directions, and may not run if any join is not an arrow. The joins should point away from the table that has unmtached records.
In the table that has unmatched records, double-click the fields that you want the query to return.
Optionally, enter criteria for any of these fields, or create calculated fields.
For the table that has related records, double-click each field that is joined to the first table, to add these fields to the query design grid. For each of these fields, clear the box in the Show row, and type Is Null in theCriteria row.
On the Design tab, in the Results group, click Run.
|


No comments:
Post a Comment