Microsoft Office Excel 2010 provides several methods for starting and exiting the program. You can open Excel by using the Start menu or a desktop shortcut. When you want to exit Excel, you can do so by using the File tab, the Close button, or a keyboard shortcut.
Starting Excel 2010 from the Start menu
To start Excel 2010 from the Windows Start menu, choose Start→All Programs→Microsoft Office→Microsoft Excel 2010. A new, blank workbook appears, ready for you to enter data.
Excel 2010 displays a new, blank workbook when you start the program.
Pinning Excel 2010 to the Start menu
If you use Excel all the time, you may want to make its program option a permanent part of the Windows Start menu.
Follow these steps to pin Excel 2010 to the Start menu:
Click the Start button and then right-click Microsoft Excel 2010 on the Start menu to open its shortcut menu.
If you don’t see Microsoft Excel 2010 displayed on the recently used portion on the left side of the Windows Start menu, start Excel 2010 and then repeat this step.
Click Pin to Start Menu on the shortcut menu.
After pinning Excel to the Start menu, the Microsoft Excel 2010 option always appears in the left column of the Start menu and you can then launch Excel by clicking the Start button and then clicking this option.
Creating an Excel 2010 desktop shortcut
You may prefer having the Excel 2010 program icon appear on the Windows desktop so that you can launch the program from there.
To create an Excel 2010 desktop shortcut, follow these steps:
Choose Start→All Programs→Microsoft Office.
Right-click Microsoft Excel 2010, highlight Send To on the shortcut menu, and click Desktop (Create Shortcut) on its continuation menu.
A shortcut named Microsoft Excel 2010 appears on your desktop. You can rename the shortcut to something shorter, such as Excel 2010.
Right-click the Microsoft Excel 2010 icon on the desktop and then click Rename on the shortcut menu.
Replace the current name by typing a new shortcut name, such as Excel 2010, and then click anywhere on the desktop.
Exiting Excel 2010
When you’re ready to quit Excel, you have several choices for shutting down the program:
If you try to exit Excel after working on a workbook and you haven’t saved your latest changes, Excel displays an alert box asking whether you want to save your changes. To save your changes before exiting, click the Save button. If you don’t want to save your changes, click Don't Save.
Basic Calculation of Excel
–: Following
below :–
Total Work Sheets
= (34625….)
|
Total Columns
= 16384
|
Total Rows
= 1048576
|
Last Cell Number
= XFD1048576
|
Standard rows height
= 15(20 pixcels)
|
Standard columns width
= 8.43(64 pixcels)
|
A, B, C
= columns
|
1, 2, 3
= rows
|
Column + Row = Cell =A1
|
Number of undo
= 32767
|
How to go to
particular cell?
At first Click
on any cell or press then press Ctrl + G from your keyboard then Type any cell
no and ok. or Type any
cell no into name box then press Enter key. or Go to Home option
then go to Ending then Find and select then go to then type any cell no and ok.
Using Date Functions in Excel
There are a number of date functions available in Excel. Depending on your needs, you can use a date function in Excel to return the current date, the current time, or the day of the week. This article covers using the most commonly used date functions used in Excel:=TODAY() and =NOW()
Like all functions in Excel, entering date functions is very straightforward - just type in the function in the cell where you want the date or time to appear.
Computer Serial Date
There are no arguments to enter for the =TODAY() or =NOW() functions. Both of these date functions draw their data from the computer's built-in clock. Computers store the date as a number representing the number of full days since midnight January 1, 1900 plus the number of hours, minutes, and seconds for the current day. This number is called a serial date.
=TODAY()
This function returns the current date. To display the date in a different format than the default:
- Click on Format > Cells in the menus to bring up the Format Cells dialog box.
- Click on the Number tab.
- Select Date in the Category window.
- Pick from the available formats in the Type window.
=NOW()
This function returns both the current date and time. To change the display to show just the date, follow the steps for the =TODAY() function above.
To change the display to show just the time:
- Click on Format > Cells in the menus to bring up the Format Cells dialog box.
- Click on the Number tab.
- Select Time in the Category window.
How do I insert a new worksheet?
Adding Worksheets - Office
- To add a single worksheet, click on the Insert menu at the top of the screen and select Worksheet.
- Another way to add one worksheet at a time is to go to the bottom of your open worksheet where you see Sheet 1.
- Right click on the name (Sheet 1, 2, etc.), and choose Insert from the menu.
- You will be asked what you would like to add, choose Worksheet and click ok.
Adding Worksheets - Office 2007
To add a worksheet in Office 2007 click the New Worksheet button to the right of your right-most sheet tab. You can also use Shift+F11.

Naming A Worksheet - All Versions
In order to change the name of a worksheet to something other than Sheet 1, Sheet 2, etc.
- Locate the sheet name at the bottom of your Excel workbook.
- Right click on the name of the sheet you want to change.
- Select the Rename option from the pop-up menu.
- Simply begin typing the name that you would like to appear.
Rename a worksheet
On the Sheet tab bar, right-click the sheet tab that you want to rename, and then click Rename.
Select the current name, and then type the new name.
Delete one or more worksheets
Select the worksheet or worksheets that you want to delete.
Click Home, click the arrow below Delete, and then click Delete Sheet.
You can also right-click the sheet tab of a worksheet or a sheet tab of any selected worksheets that you want to delete, and then click
Delete Sheet.
How to apply a border to cells in Excel
Borders build directly on Excel's grid system. They are one of the best ways to visually organize content in Excel, or to call attention to certain information.
Let's take a look.
Before you apply borders, you may want to turn off the gridlines that appear by default in Excel. This will make it easier to see the borders you create. You can turn off gridlines by unchecking gridlines on the Layout tab of the ribbon.
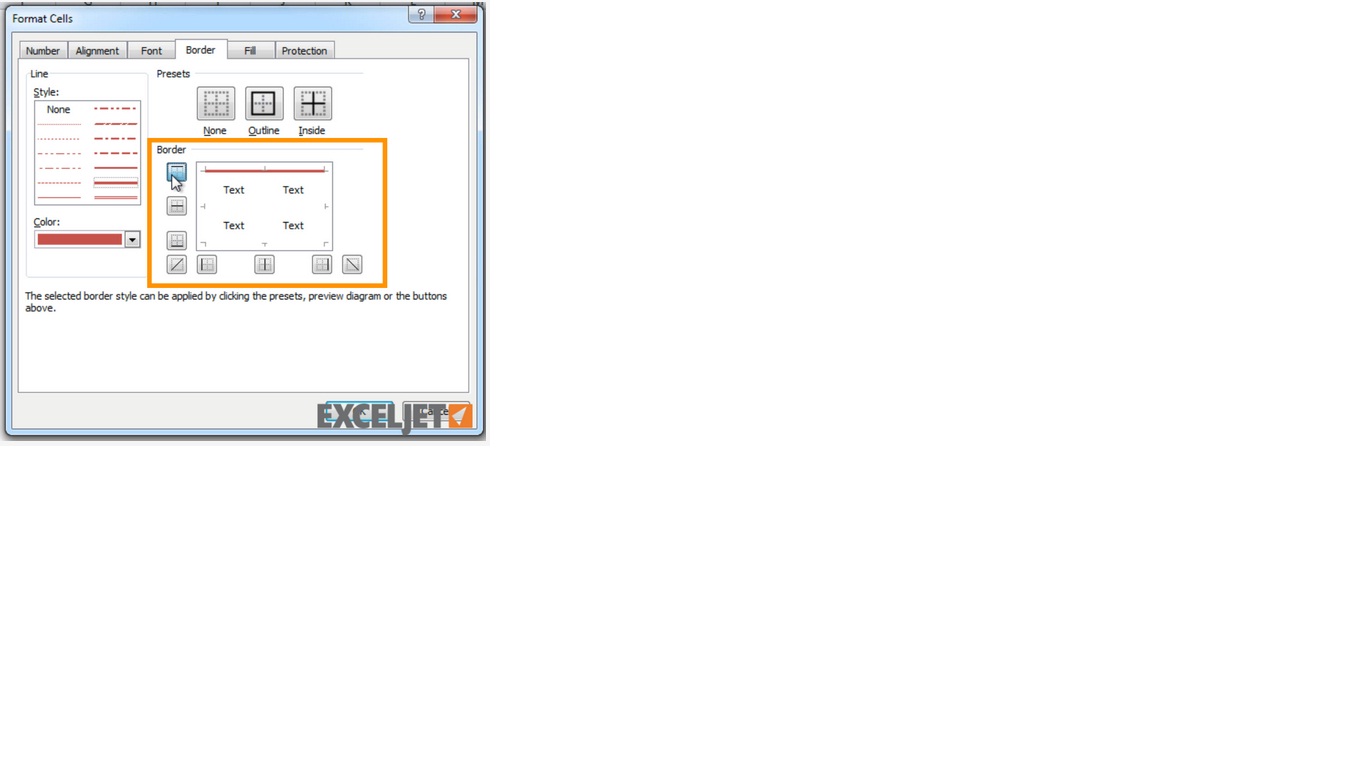
To apply a border, first select the cells you want add borders to. Then open the Format Cells dialog box and navigate to the Border tab.
Applying a border is a three-step process.
First, select the line style that you'd like to use for the border. Excel provides a number of different line styles and weights.
Second, select the color that you'd like to use for your border.
Third, select the location of the border you wish to create. You have the option to add a border to the top, bottom, left, and right of the current selection, and also the option to add a border between rows and cell columns. Finally, you can add lines that run diagonally across the cells.
You can either click the buttons for each option, or click directly in the border preview area. In each case, click once to enable the border, and click again to disable the border.
The border tab also contains border presets. These are shortcuts to quickly add more than one border setting at a time.
The None preset will clear all borders in one click. Use this when you want to clear all borders.
The Outline preset places around the outside edge of currently selected cells.
The Inside preset adds borders between cells, both horizontally and vertically.
Note that each border you apply uses the current line and style selection. This makes it possible to apply different kinds of borders to the same cells.
For example, by switching the line style and weight, we could add a heavy gray border around all cells and a thin gray dotted border between all cells.


No comments:
Post a Comment