How to Create Wind
Effects in Photoshop
Intuitively, images that convey a sense of motion tend to draw
greater viewer interest than those without motion. Wind effects added with
Photoshop can quickly provide this motion for your images. Though the
application includes a Wind filter for this purpose, the filter only affects
the brighter parts of the image,
meaning that brightness from the background
can bleed onto the subject you want to target the wind effect on while darker
parts of your subject remain unaffected. Fortunately, Photoshop’s selection and
layering tools enable you to bypass these issues in just a few steps.
Step 1
Right-click the Tools palette icon shaped like a lasso to bring up
the Lasso tool, and select "Polygonal Lasso" from its options.
Position the mouse pointer directly over a point on the outline of the image
portion you want to appear windblown. Click the mouse, then drag a short
distance to another point on the outline and click again. Repeat this process
to trace around the entire image portion, then double-click to complete the
selection.
Step 2
Press "Ctrl-C" to copy the selected portion to the
clipboard, then click "Edit | Paste Special | Paste in Place" to
create a new layer that holds your cutout subject. Using Paste in Place instead
of the regular Paste command ensures that the subject aligns with the original
image.
Step 3
Use Lasso to trace just the dark parts of the subject, then use
Copy and Paste in Place to duplicate those parts onto their own layer. For
example, if your main subject is a head shot of a person wearing a fedora hat,
repeat the step on using Lasso, Copy and Paste in Place to create a new layer
with just the dark hat band.
Step 4
Press "Ctrl-I" to run the Invert command, which turns
dark imagery light, and vice versa. Click "Filter | Stylize | Wind" to
display the controls for the Wind filter. Click the "Wind" option
under the Method heading to specify Wind, as opposed to the "Blast"
and "Stagger" options.
Step 5
Click the "From the Left" option if you want the wind
effect to appear as if it were blowing left-to-right across your subject; click
"From the Right" for the opposite direction. Then click
"OK" to close the Wind dialog and to apply a wind effect to the
inverted dark parts of your subject. Press "Ctrl-I" again to make the
inverted parts dark again. Your subject’s dark elements appear windblown.
Step 6
Click the Layers panel item that shows a thumbnail of the subject
you've cut out. This selects the subject for editing. Run the Wind filter on
the subject just as you did the dark parts of the subject. Both dark and light
parts of the subject now appear windblown.
How to insert Vector Mask to a Layer in Photoshop
Whereas layer masks let you create soft-edged masks in Photoshop CS6, vector masks create hard-edged masks defined by shapes created by a vector path on a layer. Vector-based shapes produce clean, smooth, and well-defined edges that are never jagged. And you can size and transform vector shapes without ever degrading the appearance of the element.
You create a vector mask when you create a shape with any one of the shape tools. You can also create a vector mask when you convert type to a shape. (Choose Layer→Type→Convert to Shape.)
To add a vector mask to layer, follow these steps:
- Select the layer in the Layers panel and choose Layer→Vector Mask→Reveal All or Hide All.Remember that you can’t add a vector mask to a background layer.
- Choose Window→Paths. In the Paths panel, select the Vector Mask layer.
- Select the Pen tool or grab any of the Shape tools.
- On the vector mask, create the desired shape for your vector mask.Notice how everything inside the path (represented by the white area on the vector mask thumbnail) is visible and everything outside the path (represented by the gray areas on the vector mask thumbnail) is hidden, or masked. If necessary, edit your path with the Direct Selection tool (white arrow). As you edit the path, the mask dynamically updates.
![[Credit: ©iStockphoto.com/EXTREME-Photographer Image #18577493]](http://media.wiley.com/Lux/86/331086.image0.jpg) Like layer masks, you can add vector masks only to layers, not backgrounds. If necessary, simply convert your background to a layer by double-clicking the background in the Layers panel.
Like layer masks, you can add vector masks only to layers, not backgrounds. If necessary, simply convert your background to a layer by double-clicking the background in the Layers panel. - If your vector mask is satisfactory, save your file and then close it.
Selections In Photoshop With Quick Masks
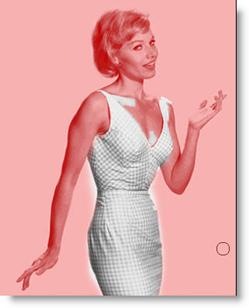
In Adobe Photoshop, you can make temporary masks, called quick masks. Masks let you isolate and protect parts of an image. When you create a mask based on a selection, the area not selected is masked or protected from editing.
Creating a quick mask
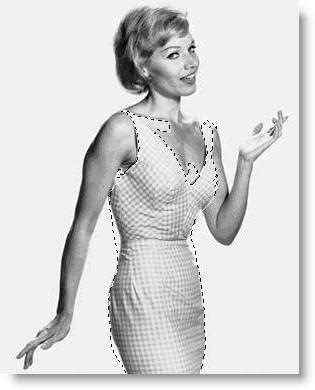
1. Open the image you want to make a selection on.
Sometimes you can make a large chunk of a selection by using the magic wand to begin with.
Sometimes you can make a large chunk of a selection by using the magic wand to begin with.
2. Select the magic wand tool ( ).
).
3. Click anywhere on the dress to begin the selection process.
4. To add to the selection, hold down Shift whilst clicking with the magic wand to add to the selection.
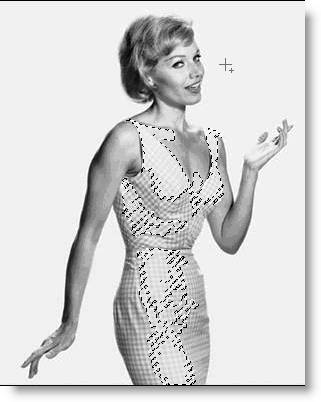
The dress is still only partly selected. Now we’re going to add to this selection using a quick mask.
6. Select the Quick Mask mode button ( ) in the toolbox. By default, you work in Standard mode. When you click on the Quick Mask button, you will work in Quick Mask mode. If you click this button again you will go back to standard mode.

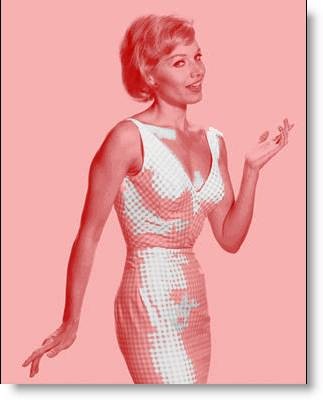
In Quick Mask mode, a red overlay (known as rubylith) appears, to mask and protect the area outside the selection.
Editing a quick mask
Now we need to refine the selection of the dress by adding to or erasing parts of the masked area. We do this by using the brush tool to make changes to your quick mask. The advantage of editing your selection as a mask is that you can use almost any tool or filter to modify the mask.
In Quick Mask mode, Photoshop automatically defaults to Grayscale mode. The foreground colour defaults to black, and the background colour defaults to white. When using a painting or editing tool in Quick Mask mode, keep in mind:
- Painting with white erases the mask (the red overlay) and increases the selected area.
- Painting with black adds to the mask (the red overlay) and decreases the selected area.
Adding to a selection by erasing masked areas
Start by painting with white to increase the selected area within the dress. This erases some of the mask.
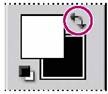
1. To make the foreground color white, select the Switch Foreground and Background Colors icon ( ) above the foreground and background colour-selection boxes.
2. Select the brush tool ( ).
).
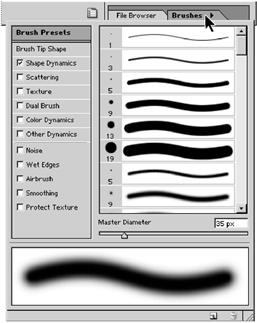
3. In the tool options bar, make sure that the mode is Normal. Then click the arrow to display the Brushes pop-up palette, and select a medium-sized brush.
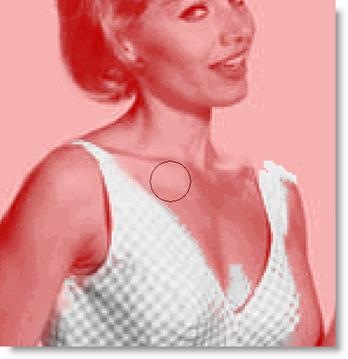
4. Using the brush tool, begin painting over the red areas within the dress. As you paint with white, the red areas are erased.
Don’t worry if you paint outside the outline of the dress. You can make adjustments later by masking areas of the image as needed.
Don’t worry if you paint outside the outline of the dress. You can make adjustments later by masking areas of the image as needed.
5. Continue painting with white to erase all of the mask (red) in the dress. As you work, switch back and forth between Quick Mask mode and Standard mode to see how painting in the mask alters the selected area.
Notice that the selection border has increased, selecting more of the dress.
6. Once you’ve erased all of the red areas within the dress, click the Standard mode icon ( ) again to view your quick mask as a selection. Don’t worry if the selection extends a bit beyond the dress.

7. If necessary, zoom out so that you can see the entire image.
Subtracting from a selection by adding masked areas
Subtracting from a selection by adding masked areas
If you’ve erased the mask beyond the edges of the dress, part of the background is included in the selection, so you need to return to Quick Mask mode and restore the mask to those edge areas by painting with black.
1. Click the Quick Mask Mode button (![clip_image004[1]](http://dab1nmslvvntp.cloudfront.net/wp-content/uploads/2009/06/clip-image0041-thumb.gif) ) to return to Quick Mask mode.
) to return to Quick Mask mode.
2. To make the foreground colour black, select the Switch Foreground and Background Colours icon (![clip_image009[1]](http://dab1nmslvvntp.cloudfront.net/wp-content/uploads/2009/06/clip-image0091-thumb.gif) ) , or press X on the keyboard. Make sure that the black colour box now appears on top. Remember that painting with black will add to the red overlay.
) , or press X on the keyboard. Make sure that the black colour box now appears on top. Remember that painting with black will add to the red overlay.
3. Choose a brush from the Brush pop-up palette. Select a small brush to refine the edges of the selection.
4. Now paint with black to restore the mask (the red overlay) to any of the background area that is still unprotected. Continue working until only the area inside the dress remains unmasked and you are completely satisfied with your mask selection.
5. In the toolbox, switch to Standard mode to view your final dress selection, and continue working this way till you have the selection the way you want it.
How To Use Layer Masks and Vector Masks to Remove Complex Backgrounds in Photoshop

Ever removed a background in Photoshop, only to find want to use parts of that background later? Layer Masks and Vector Masks are the elegant and often misunderstood answer to this common problem. Keep reading to see how they work.
In this article, we’ll learn exactly what a Layer Mask is, and two methods to use them in practically any version of Photoshop, including a simpler example for less experienced Photoshop users, and another for more seasoned users who are comfortable with the Pen tool and vectors.
The Simple Method: How To Use Layer Masks

Start with an image appropriate for background removal. This image and hundreds like it are available on Wikipedia under Wikipedia Pictures of the Day. Simply use your own if you have photographs you wish to mask.

Make a copy of your background layer by right clicking on it in your Layers Panel. By default, it will rename your new layer to “Background copy.” For nearly all situations, this is fine. Click OK.


Click the  to hide your original Background layer as shown on the above left.
You can then click the  icon to create the blank mask on your layer. Make sure your layers panel looks like the image on the right to ensure your have a blank mask ready and selected and your background layer successfully turned off.

Press  to select the Brush Tool. Right click somewhere in your image to adjust your brush hardness and size. The default “Hard Round” brush is a good setting for this, as well. Otherwise, note the 100% Hardness setting shown above.
| Hint: Check your Foreground/Background colors before you do anything. You’re going to want to paint with a foreground color of black and keep a background color of white. You can always press “d” on your keyboard to ensure you revert to the proper 100% black and pure white. Simply paint into your new mask, and all areas you paint over will vanish, masked away to the background. 
Simply right click on the mask you’re working in in your layers panel. You’ll be given this contextual menu, where you can “Disable” your layer mask, delete it, or “Apply” it, which uses the mask you’ve painted to delete your masked information.

Beyond that, painting out your information with layer masks is no more complex than using the Eraser tool. Carefully paint around your object to remove it.

It helps to start with the most difficult areas closest to your object before removing the bulk of your image.

Once your most difficult areas are finished, you can use a larger brush to mask out the areas you don’t want.

Voila, your image is complete and masked for use anywhere you please. Not satisfied? Here’s an advanced method using vector masks.

Vector masks are not very different from Layer Masks, except that they use vector primitives to create their Alpha mask channels. To create these vector primitives, we’ll have to use the Pen tool to create a work path we can mask our layer with. Start by creating a copy of your background, as done in the previous method.
If your work path is complete and connected to itself as a complete, contiguous shape, you can draw in the little fiddly shapes and gaps that pop up inside the object without problems.

Draw in all the shapes inside the object in the same work path. You should have handsome vector lines around your object similar to these.

Navigate to Layer > Vector Mask > Current Path to create a Vector Mask from your current Work Path. Your active work path will become a Vector mask, and remove the background from your object with no additional steps!

From there, you can do any absurd thing to your image you care to, changing backgrounds and scaling your vector object to all manner of ridiculous sizes. Have fun working with layer masks and removing those complex backgrounds!
How to Modify a Brush in Photoshop Elements
Modifying a brush in Photoshop Elements will give you the power to edit photos accurately and produce colorful designs for your website or letterhead. Several options are available to change the brush stroke including opacity, spacing, fade and hardness. The Brush tool can simulate real brush strokes for an artistic effect, or draw repeating patterns. Using different brush tips and modifying the settings will provide you with an assortment of brushes to fit every project.
Step 1
Click the “File” menu and select “New” to create a new file, or click “Open” and navigate to an existing file to edit it.
Step 2
Click the “Brush” tool in the Tool Box. The Brush tool’s icon is a paintbrush dipped in blue paint.
Step 3
Go to the Options Bar and click the small arrow next to the brush’s thumbnail to view the Brushes menu. Click on a brush tip and enter a pixel size for the brush. Set a blending mode for the brush by clicking the “Mode” drop-down menu. Lower the opacity of the brush to make it semi-transparent.
Step 4
Click “More Options” in the Options bar.
Step 5
Set values for the additional brush options. Reduce the brush’s hardness to create a stroke with soft, indistinct edges. Spacing creates gaps in the brush stroke. The fade setting causes the brush strokes to diminish as you paint. Increasing the scatter setting will disperse the brush marks over a larger area. Adjusting the hue jitter causes the brush to alternate between the foreground and background colors. Changing the angle and roundness settings affect the shape of the brush tip. For example, you could change a round brush tip to an elliptical brush tip.
How to Add Noise to Images in Photoshop
Noise in images consists of any graininess or texture that occurs. Noise filters, such as the Photoshop CS6 Add Noise plug-in, produce random texture and grain in an image.
How to insert the last effected filter?
Go to Filter option then click on Last filter.
|
No comments:
Post a Comment